Configure Advanced Integration between Git and Redmine
Introduction
This guide walks you through the process of configuring Redmine to connect to a Git repository, so that users created in the Redmine application can also use the Git repository. For example, new users in the Redmine application will also be able to “push” changes to the Git project repository. This guide is based on the Felix Schafer guide posted on the Redmine Wiki.
NOTE: Before starting this guide, take into account that these steps are not necessary if all you wish to do is track the repository changes in the Redmine application. If you only wish to track repository changes and link to issues, you only need to configure the project to point to your repository, as described in the section on using Git with Redmine.
Assumptions and pre-requisites
This guide assumes that:
- You have a working Redmine instance.
- You have a working knowledge of Git and Redmine.
Step 1: Configure Grack
The first step is to configure Grack, as follows:
-
Create a Git repository. This guide will create a repository named test under the projects/ directory in the user’s home directory. Note the name of the repository as you will need to use the same name as the identifier for your Redmine project in a later step.
$ cd $HOME $ mkdir projects $ mkdir projects/test $ cd projects/test $ sudo git init --bare -
Download the Grack project from GitHub:
$ cd /opt/bitnami/apache/htdocs/ $ git clone http://github.com/schacon/grack.git $ sudo chown bitnami:daemon grack -
Edit the grack/config.ru file to specify your Git project location. Replace the USERNAME placeholder with the correct username.
$LOAD_PATH.unshift File.expand_path(File.dirname(__FILE__) + '/lib') use Rack::ShowExceptions require 'git_http' config = { :project_root => "/home/USERNAME/projects/", :adapter => Grack::GitAdapter, :git_path => '/opt/bitnami/git/bin/git', :upload_pack => true, :receive_pack => true, } run GitHttp::App.new(config) -
Test the basic behaviour: start the Grack server and try to clone the repository and push the changes from a different machine.
  $ cd /opt/bitnami/apache/htdocs/grack
  $ rackup --host 0.0.0.0 -p 8080 config.ru &
If all goes well, you should see a message that the Thin web server is running and listening for connections, as below:
  >> Thin web server (v1.5.1 codename Straight Razor)
  >> Maximum connections set to 1024
  >> Listening on 0.0.0.0:8080, CTRL+C to stop
IMPORTANT: Also ensure that port 8080 is open in the firewall as otherwise, the next step will fail.
-
Next, clone the repository, add your name and email address, and push changes from a different machine. Remember to replace the SERVER-IP placeholder below with the actual IP address of your Redmine server, and the EMAIL_ADDRESS and NAME placeholders with your email address and real name.
  $ cd /tmp/
  $ git clone http://SERVER-IP:8080/test
  $ cd test
  $ git config user.email "EMAIL_ADDRESS"
  $ git config user.name "NAME"
  $ echo "test" > test_file
  $ git add test_file
  $ git commit -m "test" test_file
  $ git push origin master
If all goes well, you will see something like this:
  Counting objects: 3, done.
  Writing objects: 100% (3/3), 200 bytes, done.
  Total 3 (delta 0), reused 0 (delta 0)
  To http://SERVER-IP:8080/test
  * [new branch]      master -> master
Step 2: Configure Apache with Passenger
Next, configure Apache to use Passenger and test repository access. Follow the steps below:
-
Stop the Grack server and configure Apache to serve it with Passenger. First, create two directories in the grack/ folder and install necessary dependencies:
$ mkdir /opt/bitnami/apache/htdocs/grack/public $ mkdir /opt/bitnami/apache/htdocs/grack/tmp $ cd /opt/bitnami/apache/htdocs/grack/ $ bundle install -
Edit the /opt/bitnami/apache/conf/bitnami/bitnami.conf file and add the code to the end of the file, replacing YOUR_DOMAIN_NAME with your own domain name or the domain name of your server:
<VirtualHost *:80> ServerName git.YOUR_DOMAIN_NAME PassengerEnabled on PassengerAppRoot "/opt/bitnami/apache/htdocs/grack/" DocumentRoot "/opt/bitnami/apache/htdocs/grack/public" <Directory "/opt/bitnami/apache/htdocs/grack/public"> Options None AllowOverride None <IfVersion < 2.3 > Order allow,deny Allow from all </IfVersion> <IfVersion >= 2.3> Require all granted </IfVersion> </Directory> </VirtualHost> -
Restart the Apache server as below:
$ sudo /opt/bitnami/ctlscript.sh restart apache -
Next, clone the repository again, add your name and email address, and push changes from a different machine. Remember to replace the YOUR_DOMAIN_NAME placeholder below with your own domain name or the domain name of your server, and the EMAIL_ADDRESS and NAME placeholders with your email address and real name.
  $ cd /tmp/
  $ rm -rf test/
  $ git clone http://git.YOUR_DOMAIN_NAME/test
  $ cd test
  $ git config user.email "EMAIL_ADDRESS"
  $ git config user.name "NAME"
  $ echo "test 2" > test_file_2
  $ git add test_file_2
  $ git commit -m "test 2" test_file_2
  $ git push origin master
If all goes well, you will see something like this:
  Counting objects: 3, done.
  Compressing objects: 100% (2/2), done.
  Writing objects: 100% (2/2), 234 bytes | 0 bytes/s, done.
  Total 2 (delta 0), reused 0 (delta 0)
  To http://git.YOUR_DOMAIN_NAME/test
     328f124..68d1bb4  master -> master
Step 3: Configure Git access control
The next step is to configure Git access control using the Redmine.pm module.
-
Begin by copying the Redmine.pm file to the appropriate Perl folder:
NOTE: The paths may change depending on the stack version.
$ sudo cp /opt/bitnami/redmine/extra/svn/Redmine.pm /usr/lib/perl/lib/site_perl/5.16.3/x86_64-linux-thread-multi/Apache/ $ sudo cp /opt/bitnami/redmine/extra/svn/Redmine.pm /usr/lib/perl/lib/site_perl/5.16.3/x86_64-linux-thread-multi/Apache2/ -
Enable the module in the /opt/bitnami/apache/conf/httpd.conf by adding the following line:
LoadModule perl_module modules/mod_perl.soYou will also need to add the following lines to the /opt/bitnami/apache/bin/envvars file. Note that the library path shown below (/opt/bitnami/perl/lib/5.16.3/x86_64-linux-thread-multi/CORE/) varies depending on the platform, so it’s a good idea to verify that it exists or modify it as needed.
LD_LIBRARY_PATH="/opt/bitnami/perl/lib/5.16.3/x86_64-linux-thread-multi/CORE/:$LD_LIBRARY_PATH" export LD_LIBRARY_PATH -
Finally, update the previously-created VirtualHost in the /opt/bitnami/apache/conf/bitnami/bitnami.conf file as shown below. The REDMINE_DB_USERNAME and REDMINE_DB_PASSWORD credentials can be obtained from the Redmine /opt/bitnami/redmine/config/database.yml configuration file, from the username and password fields for the production database:
<VirtualHost *:80> ServerName git.YOUR_DOMAIN_NAME PassengerEnabled on PassengerAppRoot "/opt/bitnami/apache/htdocs/grack/" DocumentRoot "/opt/bitnami/apache/htdocs/grack/public" <Directory "/opt/bitnami/apache/htdocs/grack/public"> Options None AllowOverride None <IfVersion < 2.3 > Order allow,deny Allow from all </IfVersion> <IfVersion >= 2.3> Require all granted </IfVersion> </Directory> PerlLoadModule Apache::Redmine <Location "/"> AuthType Basic AuthName "Redmine git repositories" Require valid-user PerlAccessHandler Apache::Authn::Redmine::access_handler PerlAuthenHandler Apache::Authn::Redmine::authen_handler RedmineDSN "DBI:mysql:database=bitnami_redmine;host=localhost;mysql_socket=/opt/bitnami/mysql/tmp/mysql.sock" RedmineDbUser "REDMINE_DB_USERNAME" RedmineDbPass "REDMINE_DB_PASSWORD" RedmineGitSmartHttp yes </Location> </VirtualHost> -
After making this change, restart the Apache server as below:
$ sudo /opt/bitnami/ctlscript.sh restart apache
Step 4: Connect Redmine with Git
Finally, create a Redmine project and connect it with the Git repository:
-
Log in to Redmine and create a new project. It is important to note that the project identifier configured at this stage must match the repository name created earlier. In this example, the project identifier is test. Also ensure that the project is configured as private.
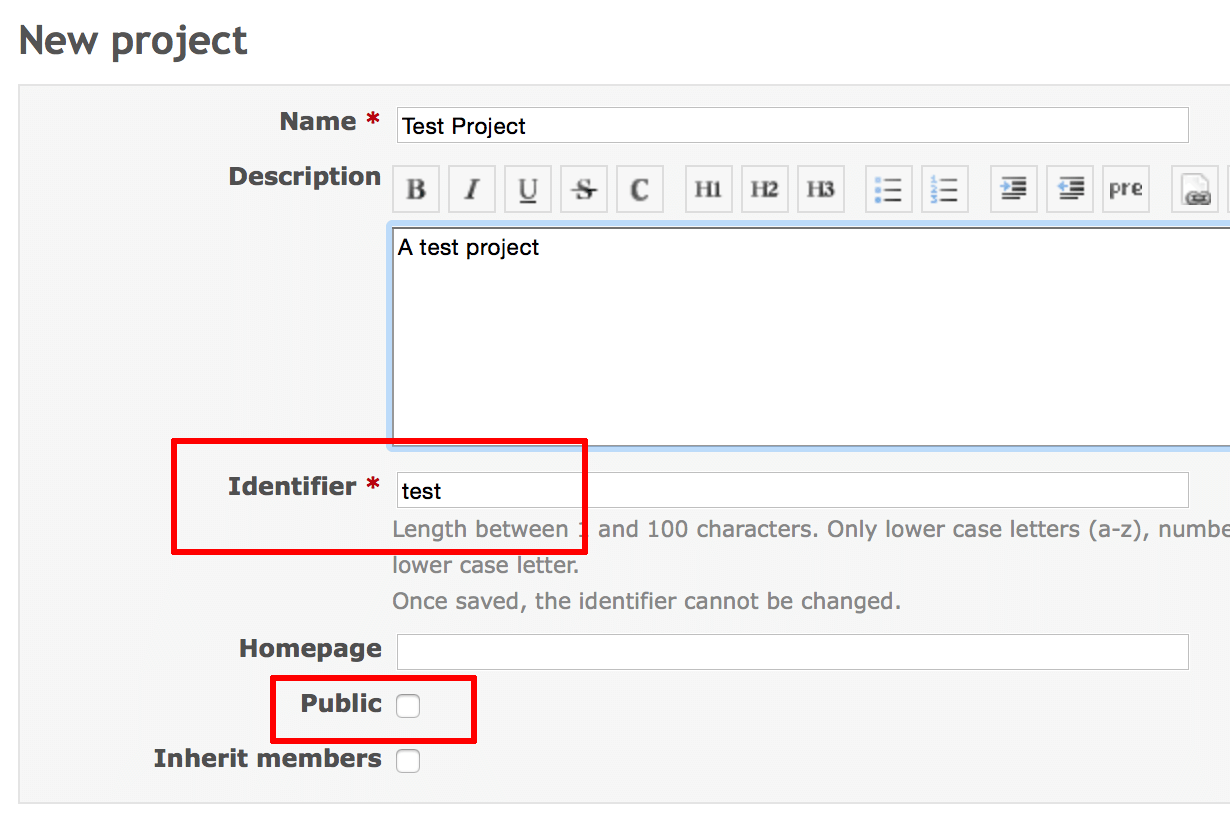
Note that the project must be configured to work as private for this configuration to work due to a Redmine bug. Click “Create” to save your changes and create the project.
-
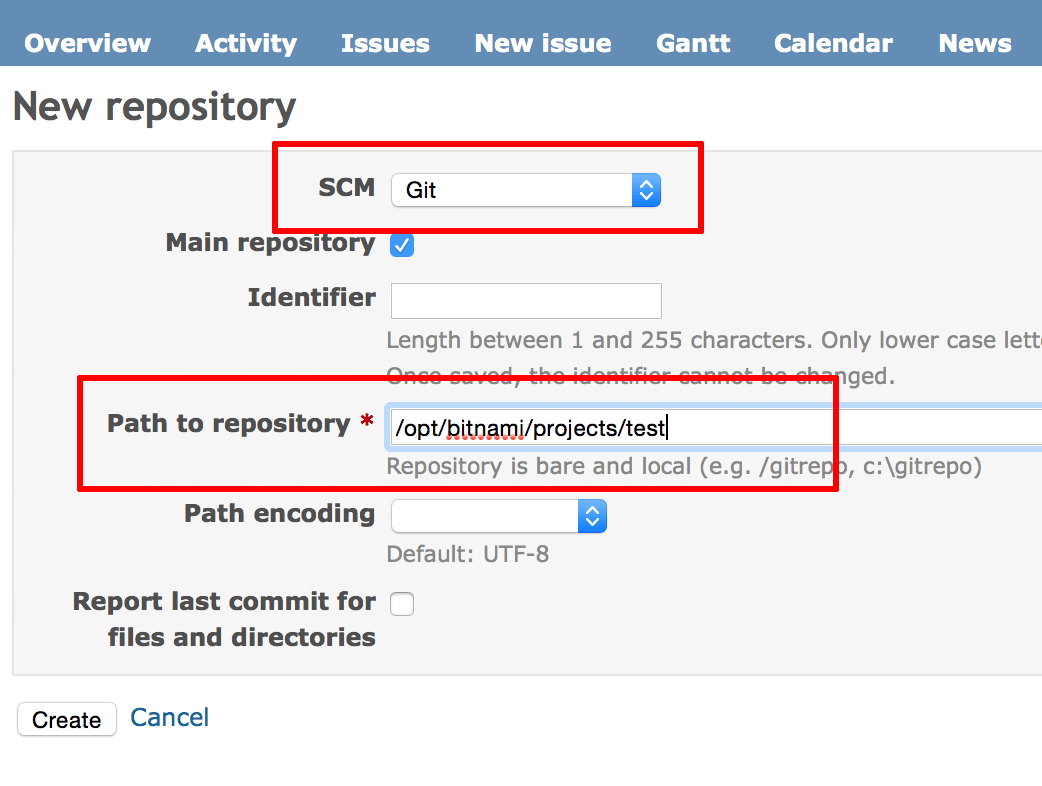
From the project dashboard in Redmine, click the “Settings -> Repositories” tab and then click the “New repository” link. Select the “SCM” as “Git” and specify the path to the repository. In this example, the path will be /opt/bitnami/projects/test. Click “Create” to save your changes.
-
From the project dashboard in Redmine, click the “Settings -> Members” tab and add one or more users to the project with role “Developer”. Save your changes.
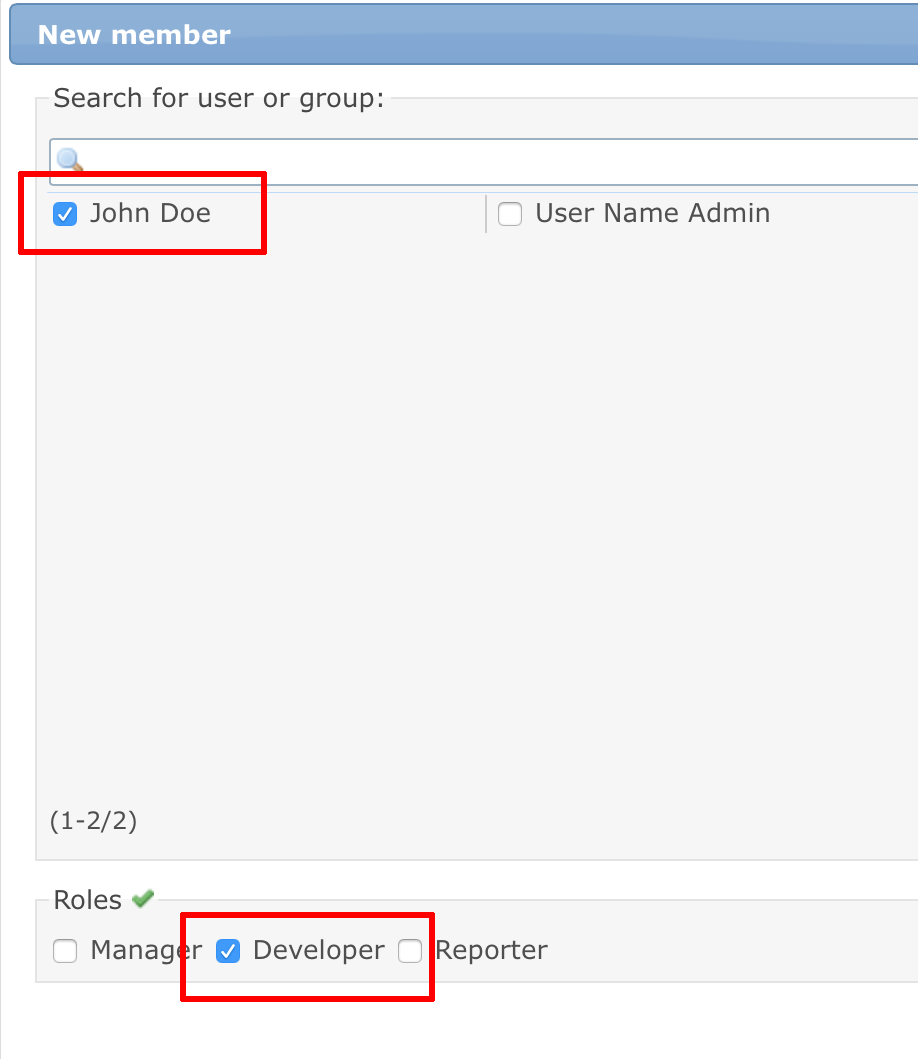
The users added to the repository should now be able to develop in the test repository using their Redmine application passwords. To test this, try cloning and pushing a change to the repository as one of the specified users. If you are successful, you will also be able to see the changes in the Redmine project’s repository view, as shown below:
