Get Started with Bitnami WordPress on AWS Marketplace (for Intermediate Users)
Introduction
WordPress is one of the most popular blogging platforms in the world, in use on over 60 million websites (according to Wikipedia). It’s not hard to understand why: WordPress is incredibly easy to use, comes with thousands of extensions and themes, and is completely free and open source.
If you’re looking to create a personal or small business website or blog, the Bitnami WordPress Stack is the quickest and easiest way to get started with WordPress. It comes with a pre-configured, secure and up-to-date installation of WordPress that you can immediately deploy and begin working with.
This guide will assume that you already know the basics of using the Bitnami WordPress Stack and will walk you through more complex tasks, such as connecting to the WordPress MariaDB database, installing an SSL certificate, and using a custom domain.
Assumptions and prerequisites
The guide assumes that:
-
You have deployed Bitnami WordPress using the AWS Marketplace and have the corresponding SSH private key in PEM format. In case you don’t know how to perform these tasks, our handy guide to getting started with Bitnami applications in the AWS Marketplace will walk you through the process.
-
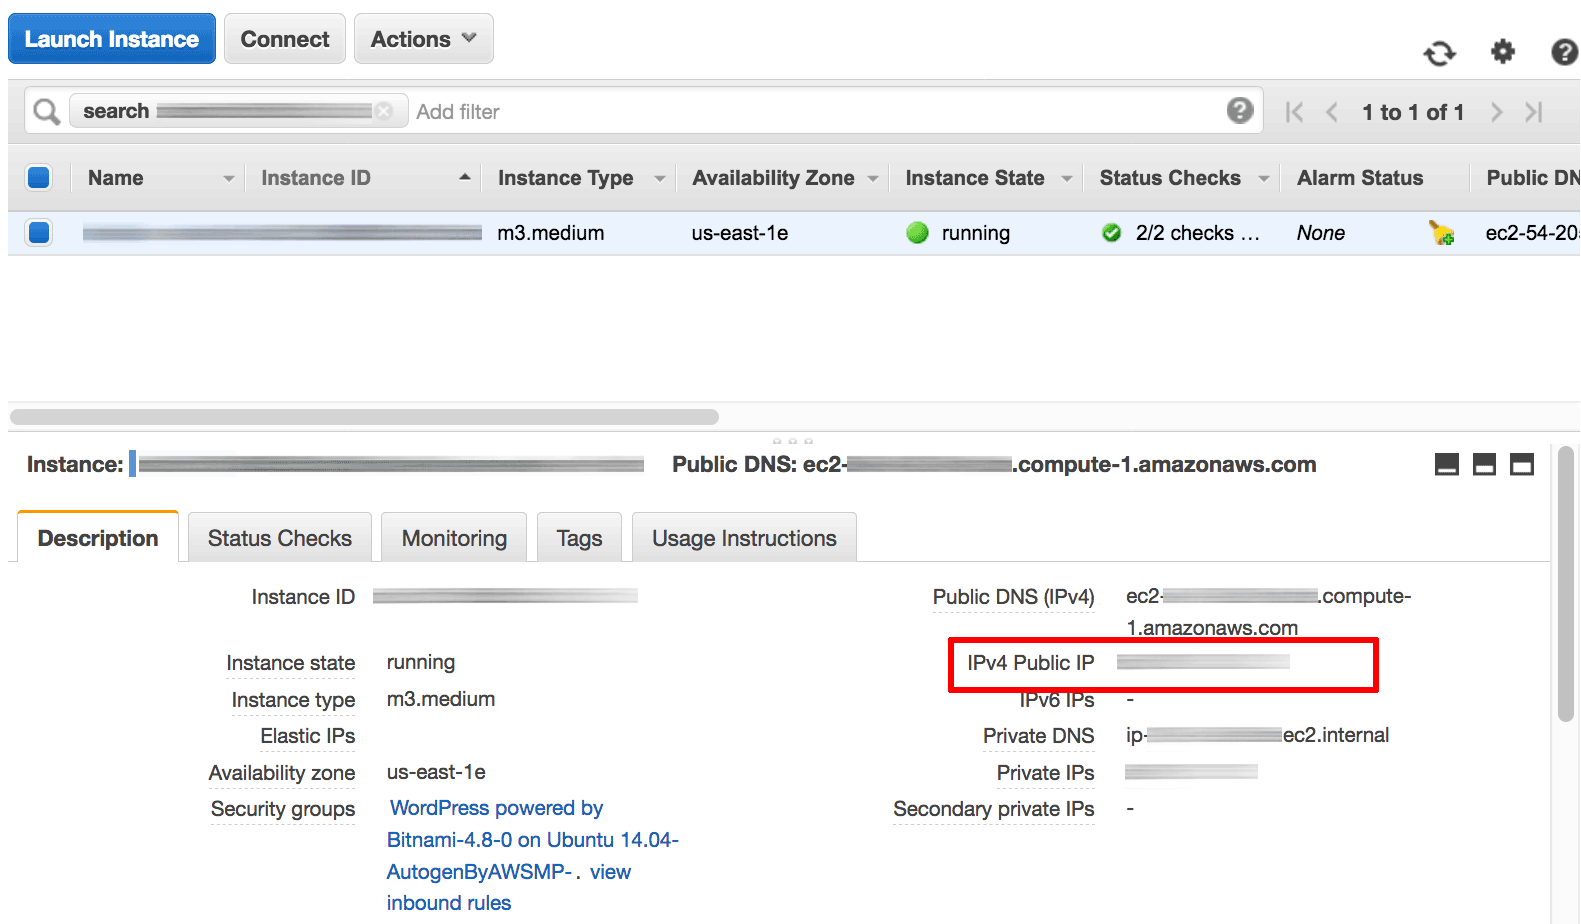
You have obtained the public IP address of your WordPress server from the AWS EC2 Console. In case you haven’t, use the image below as a reference to locate your server’s public IP address.
Connect to the WordPress server using SSH
While you can perform many WordPress configuration tasks using the WordPress Dashboard, there are some tasks which can only be performed directly from the AWS server command prompt. Therefore, you should become familiar with connecting to the AWS cloud server using a Secure Shell (SSH) login and executing commands at the console prompt.
You will connect to the server using an SSH client from your Windows, OS X or Linux desktop. As a necessary pre-requisite, you will need the SSH private key (PEM file) that you used to deploy the AWS server.
- If you’re using a Windows desktop, you should download and install PuTTY, a free SSH client for Windows and UNIX platforms.
- If you’re using a Linux or OS X desktop, you can use the SSH client that is already built in to these operating systems.
Windows
By default, your AWS private key would have been delivered as a PEM file. Before you can use this private key with PuTTY, it is necessary to convert it to PuTTY’s own PPK key file format. To do this:
-
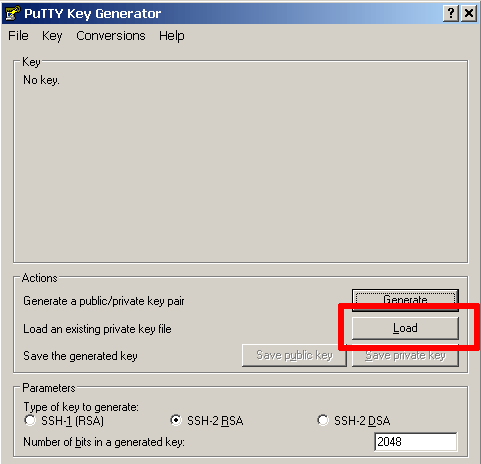
Launch the PuTTY Key Generator by double-clicking the puttygen.exe file in the PuTTY installation directory.
-
Click the “Load” button and select the AWS private key file in PEM format.
-
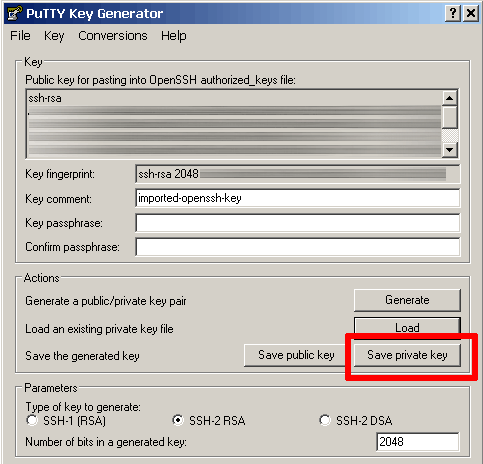
Once the private key has been imported, click the “Save private key” button to convert and save the key in PuTTY’s PPK key file format.
You can now connect to the AWS server using PuTTY as follows:
-
Launch PuTTY by double-clicking the putty.exe file in the PuTTY installation directory.
-
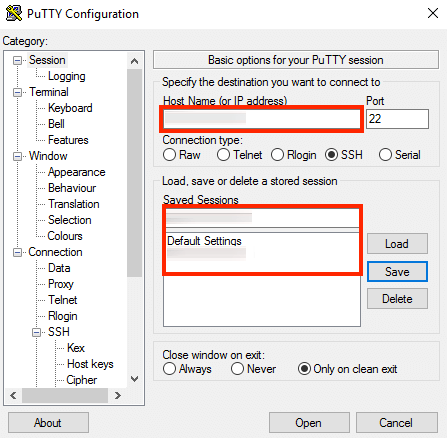
In the PuTTY configuration window, enter the host name or public IP address of your server into the “Host Name (or IP address)” field, as well as into the “Saved Sessions” field.
-
Click “Save” to save the new session so you can reuse it later.
-
In the “Connection -> SSH -> Auth” section, select the private key file in PPK format.
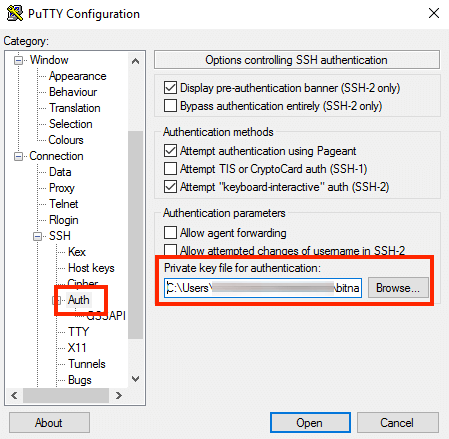
-
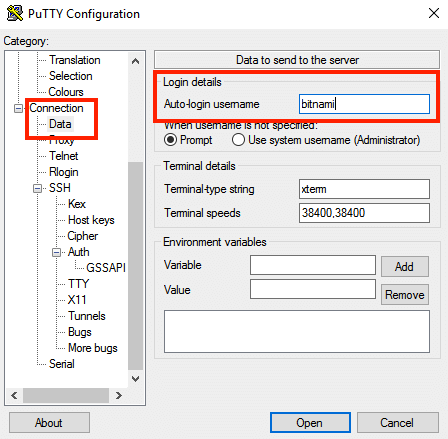
In the “Connection -> Data” section, enter the username bitnami into the “Auto-login username” field, under the “Login details” section.
-
In the “Session” section, click on the “Save” button to save the current configuration.
-
Select the saved session and click the “Open” button to open an SSH session to the server.
-
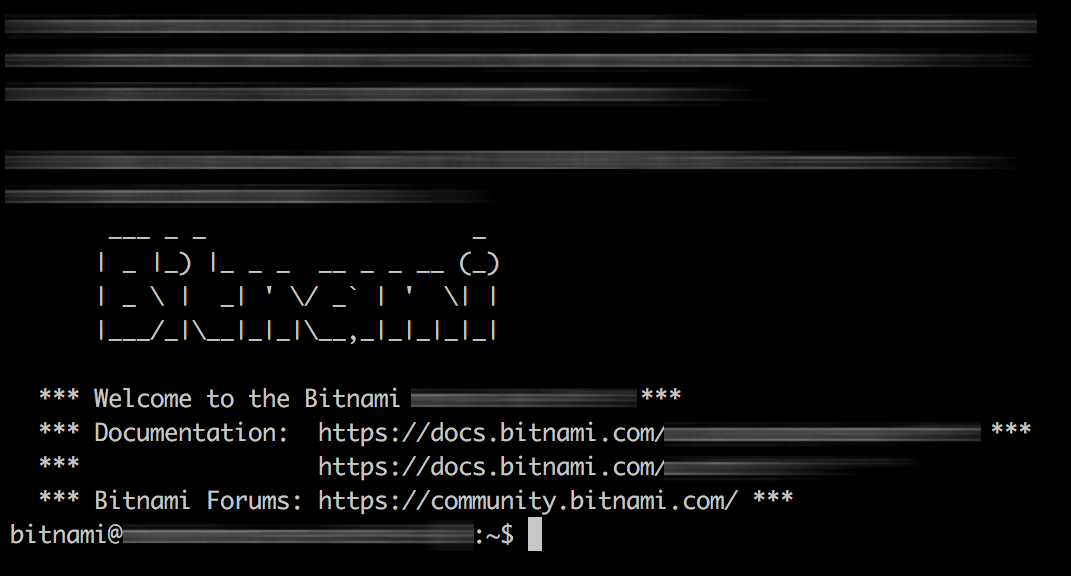
PuTTY will ask you to confirm the server’s host key and add it to the cache. Go ahead and click “Yes” to this request.
You should now be logged in to your server and be able to run commands at the server command prompt. Here is an example of what you’ll see:
Linux and OS X
The SSH clients bundled with Linux and Mac OS X can directly work with private keys in PEM format. To connect to the AWS server, follow these steps:
-
Open a new terminal window on your local system (for example, using “Finder -> Applications -> Utilities -> Terminal” in Mac OS X or the Dash in Ubuntu).
-
Set the permissions for your private key file in PEM format to 600 using a command like the one below:
$ chmod 600 KEYFILE -
Connect to the server using the command below:
$ ssh -i KEYFILE bitnami@SERVER-IPRemember to replace KEYFILE in the previous commands with the path to your private key file in PEM format, and SERVER-IP with the public IP address or hostname of your server.
-
Your SSH client might ask you to confirm the server’s host key and add it to the cache before connecting. Accept this request by typing or selecting “Yes” (learn more).
You should now be logged in to your server and be able to run commands at the server command prompt. Here is an example of what you’ll see:
Use a custom domain with your WordPress deployment
Up until this point, you would probably have been accessing your WordPress blog or website using the public IP address associated with it. However, if you already have a domain name, it’s easy to associate this domain name with your WordPress deployment.
Associate a static IP address with the AWS server
AWS instances are launched with a dynamic IP address by default, which means that the IP address changes every time the server is stopped and restarted. If you wish to use a custom domain with the Bitnami WordPress Stack, you must first add a static IP address (also known as an “elastic IP”) to your AWS server.
To configure a static IP address:
-
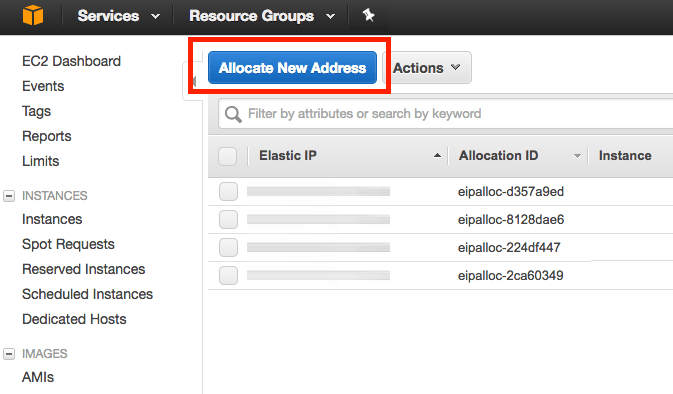
Log in to the AWS EC2 Console.
-
In the left navigation bar, select the “Network & Security -> Elastic IPs” menu item.
-
Click the “Allocate New Address” button.
-
Click “Allocate” in the next screen.
A new static IP address will be generated and will appear in the list of available IP addresses.

Next:
-
From the “Actions” drop-down menu, select the “Associate Address” menu item.
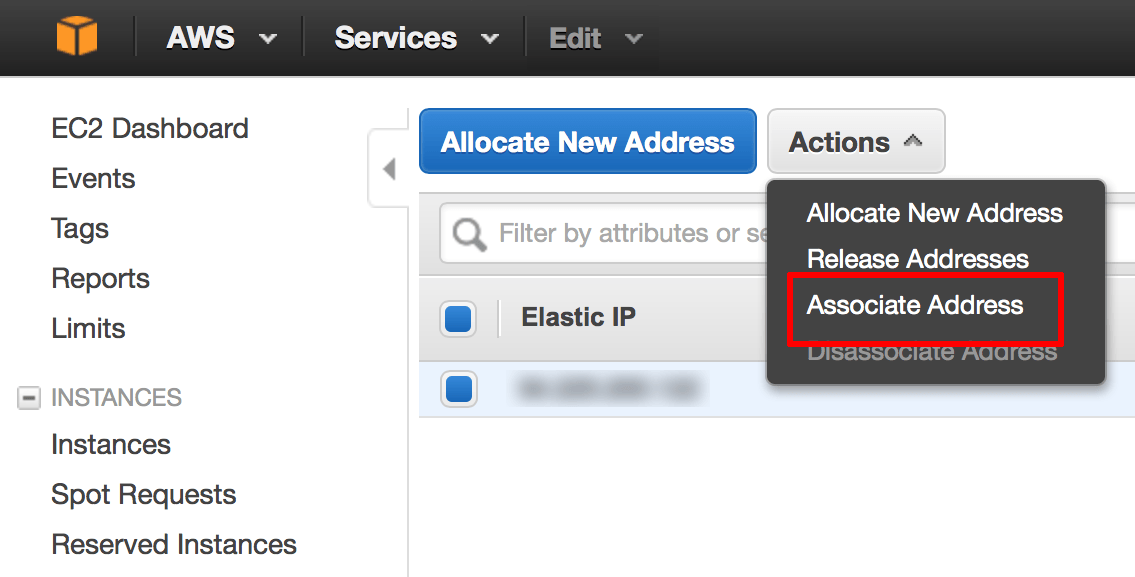
-
In the resulting dialog box, enter the instance ID of your server and click the “Associate” button.
The elastic IP address will now be assigned to your server and will persist even if you shut it down or reboot it.
Update the domain’s DNS record with the static IP address
Once you’ve created and associated a static IP address, update your domain’s DNS settings, specifically by adding an A record that points to the static IP address of your cloud server. Log in to your domain name provider’s management console and make the necessary changes. Step-by-step instructions for some popular providers are listed below:
Remember that once you make the necessary changes, it can take up to 48 hours for the change to propagate across other DNS servers. You can verify the new DNS record by using the Global DNS Propagation Checker and entering your domain name into the search field.
Once the DNS information has been updated and propagated, entering your domain name into the browser address bar should take you to the Bitnami WordPress Stack on the AWS cloud server.
Update WordPress to use the domain name
The final step is to tell WordPress about the domain name, so that is it correctly used in application URLs. Follow these steps:
-
Open the WordPress /opt/bitnami/wordpress/wp-config.php configuration file in a text editor and find the following lines:
  define('WP_SITEURL', 'http://' . $_SERVER['HTTP_HOST'] . '/');
  define('WP_HOME', 'http://' . $_SERVER['HTTP_HOST'] . '/');
Replace them with the lines below, remembering to replace the DOMAIN placeholder with the actual domain name you wish to use:
  define('WP_SITEURL', 'http://DOMAIN/');
  define('WP_HOME', 'http://DOMAIN/');
You should now be able to browse to the specified domain name and see your WordPress blog/website.
Secure WordPress with a Let’s Encrypt SSL certificate
Let’s Encrypt is a free Certificate Authority (CA) that issues SSL certificates. You can use these SSL certificates to secure traffic to and from your WordPress blog or website.
NOTE: Before proceeding, make sure that you have successfully completed the steps to use a custom domain with WordPress and that requesting your domain in your browser correctly displays your WordPress blog or website.
Bitnami includes a small tool that takes care of generating a valid certificate using Let’s Encrypt and configuring the web server to use it. That tool uses Lego to run the Let’s Encrypt certificate generation commands. You can find the script inside the /opt/bitnami directory.
-
Execute the following command to auto-configure a Let’s Encrypt certificate in your stack for a domain.
$ sudo /opt/bitnami/bncert-toolYou will be prompted to enter the domains for which you want to create a certificate. You can pass multiple domains by separating them with spaces. When supplying multiple domains, the tool creates a SAN (Subject Alternate Names) certificate which results in only one certificate valid for all domains you entered. The first domain in your list will be added as the “CommonName” of the certificate and the rest, will be added as “DNSNames” to the SAN extension within the certificate.
Now, when you browse to your domain, you should automatically be redirected to a secure (HTTPS) page, indicated by the appearance of a padlock icon in the browser address bar. Clicking the padlock icon should display the details of the SSL certificate generated by Let’s Encrypt.
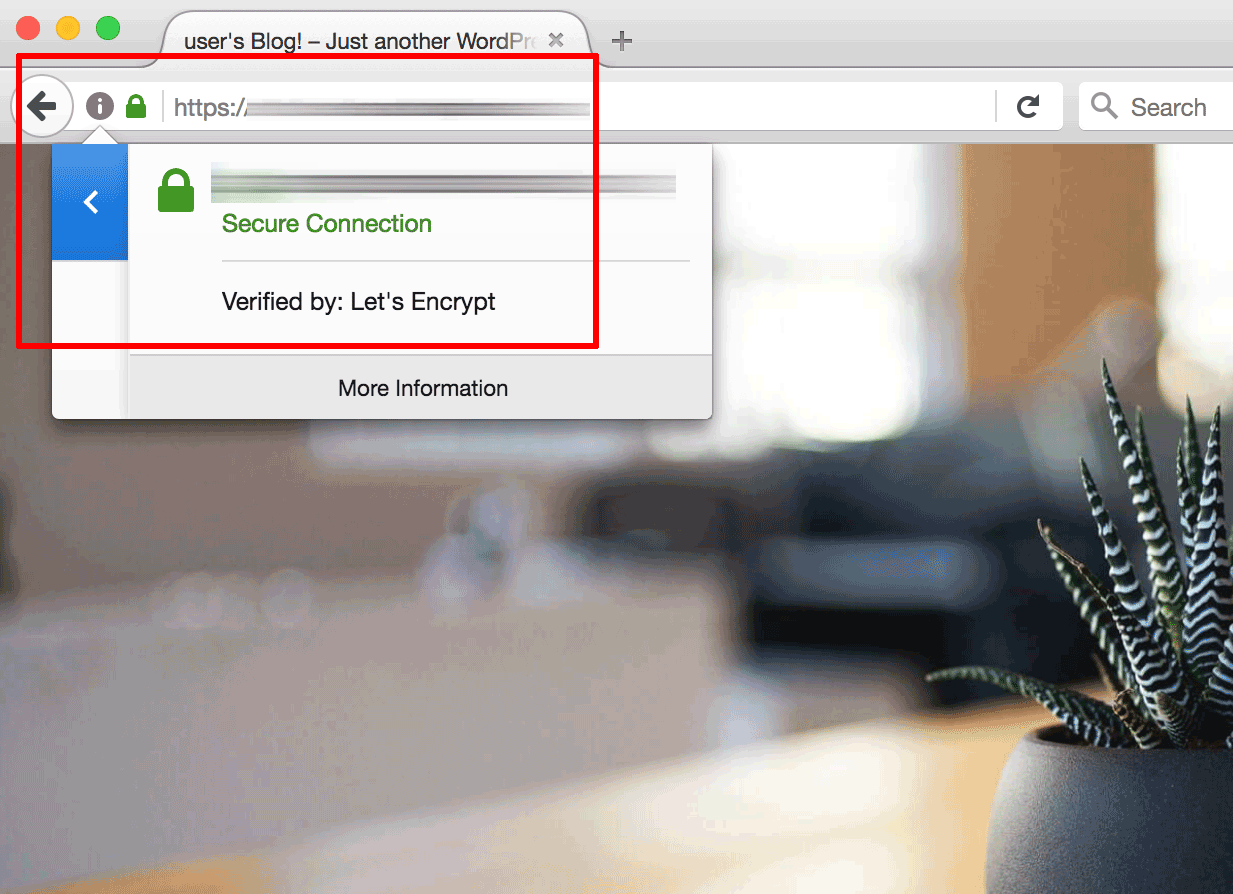
For more information, refer to our detailed guide.
Upload a custom WordPress theme or plugin
There may be occasions when you need to upload one or more files to your WordPress installation. Typically, the need for this will arise if you wish to install a custom theme or plugin, or if you are developing your own theme or plugin.
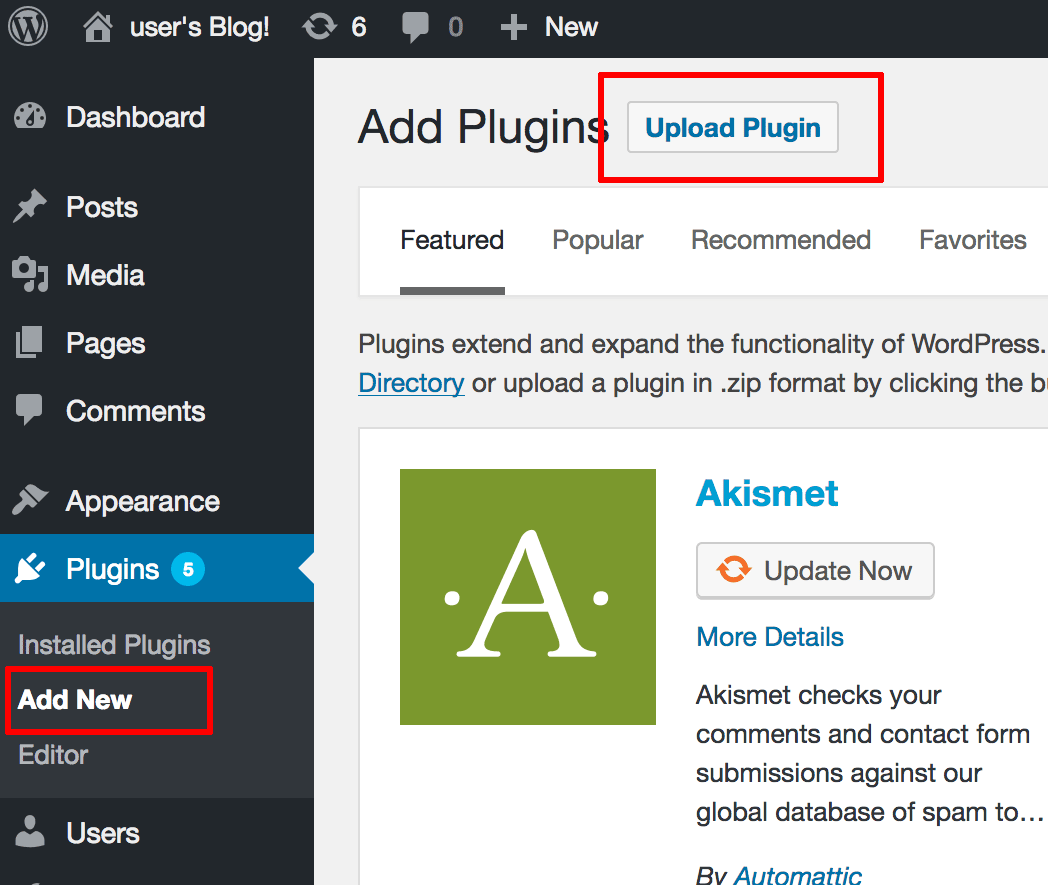
You can upload custom plugins through the WordPress Dashboard, as described below:
-
Log in to the WordPress Dashboard using the administrator account (if you’re not already logged in).
-
Navigate to the “Plugins -> Add New” page and click the “Upload Plugin” button.
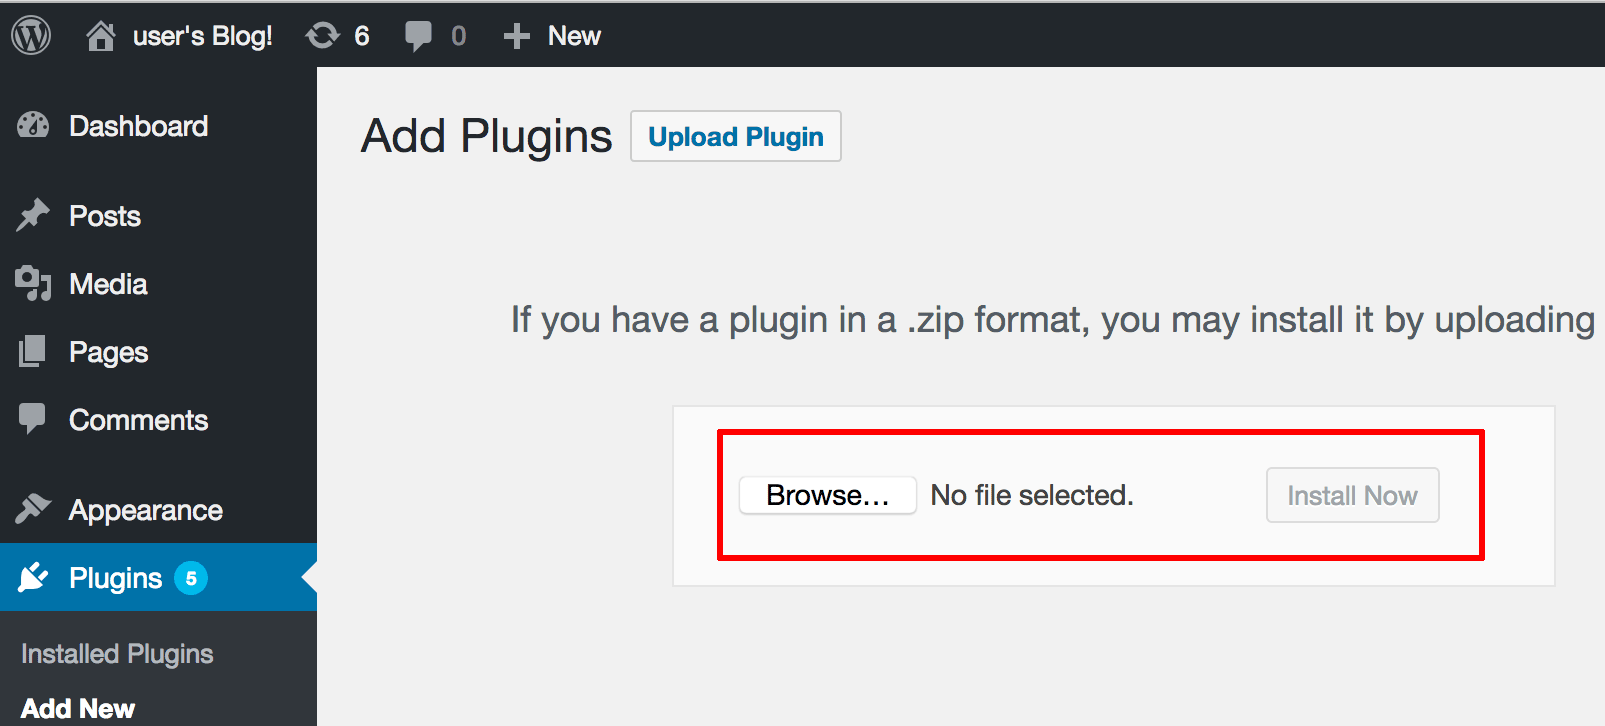
-
Click the “Browse…” button and select the ZIP file containing the plugin you wish to install.
-
Once the plugin has been uploaded, click the “Install Now” button to install it.
-
Activate the new plugin using the “Plugins -> Installed Plugins” page.
You can upload custom themes through the WordPress Dashboard, as described below:
-
Log in to the WordPress Dashboard using the administrator account (if you’re not already logged in).
-
Navigate to the “Appearance -> Themes” page and click the “Add New” button.
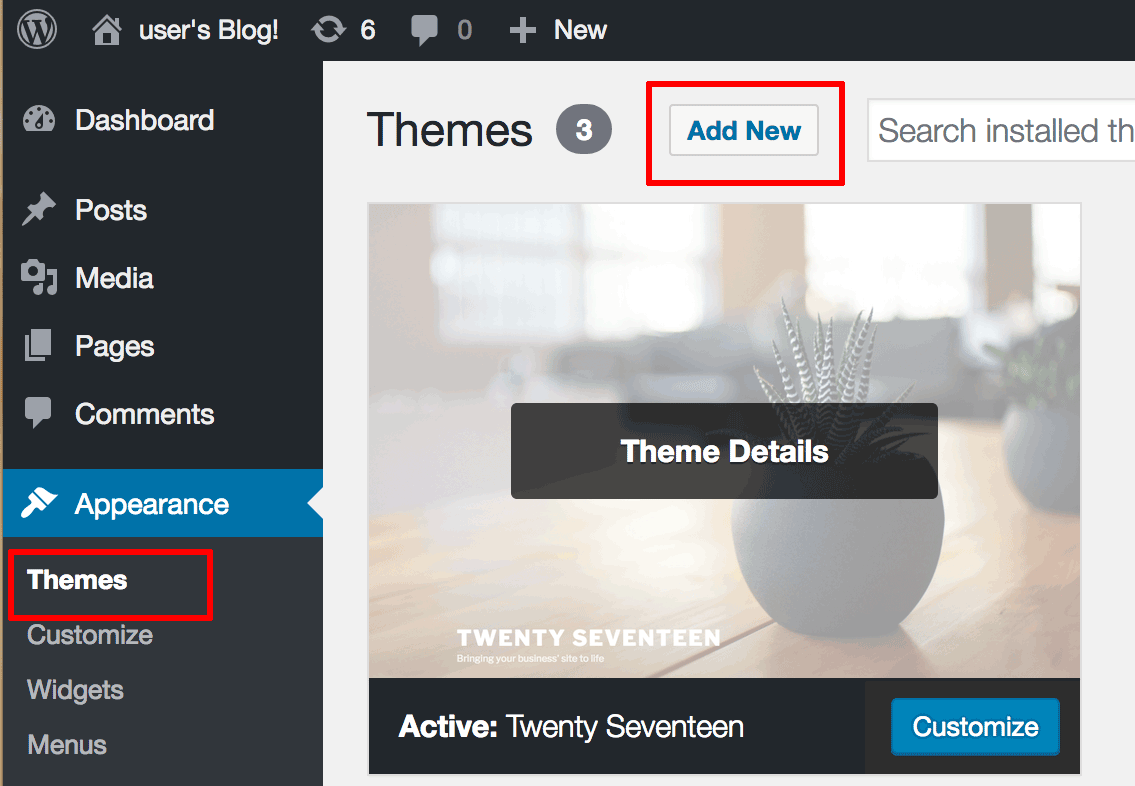
-
On the resulting page, click the “Upload Theme” button.
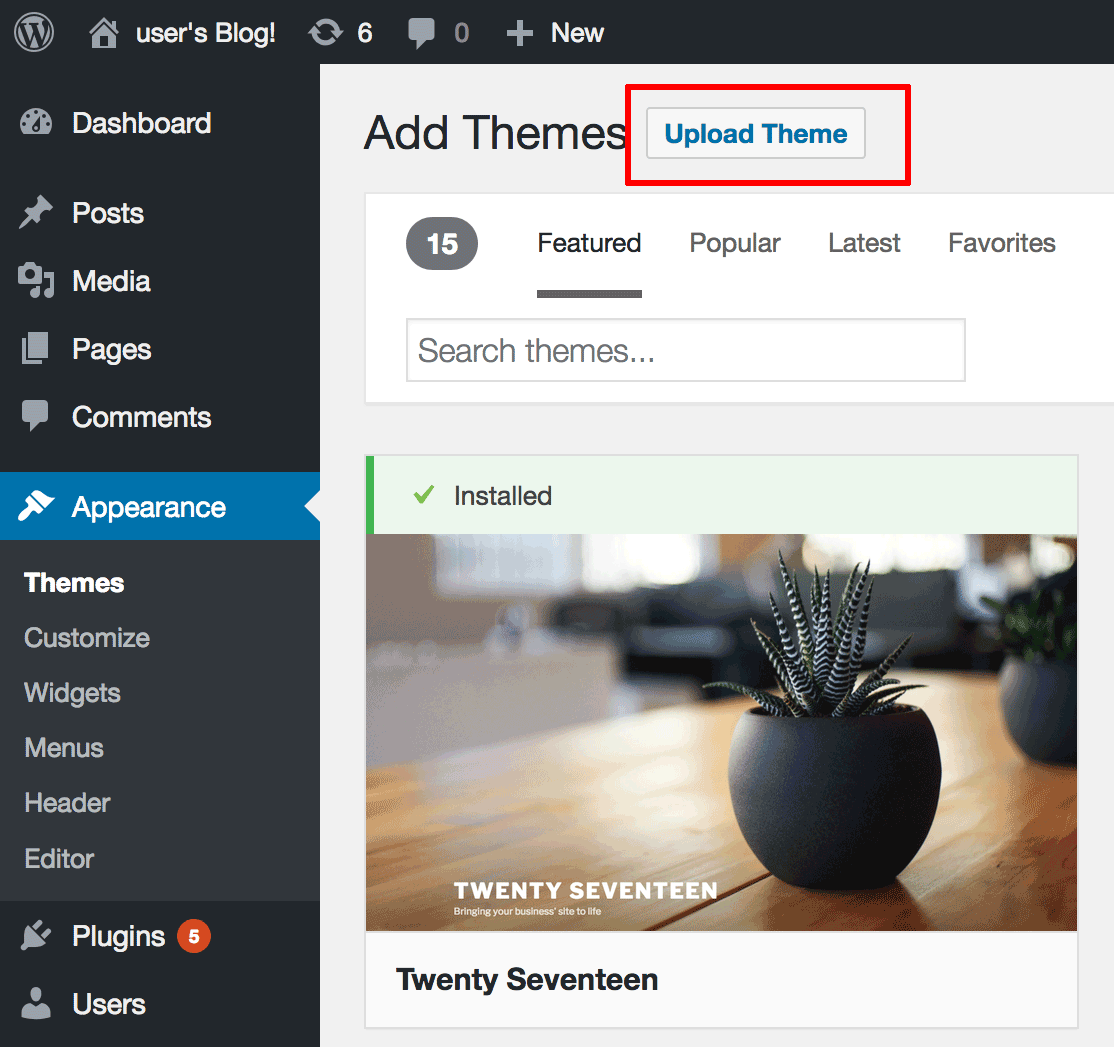
-
Click the “Browse…” button and select the ZIP file containing the theme you wish to install.
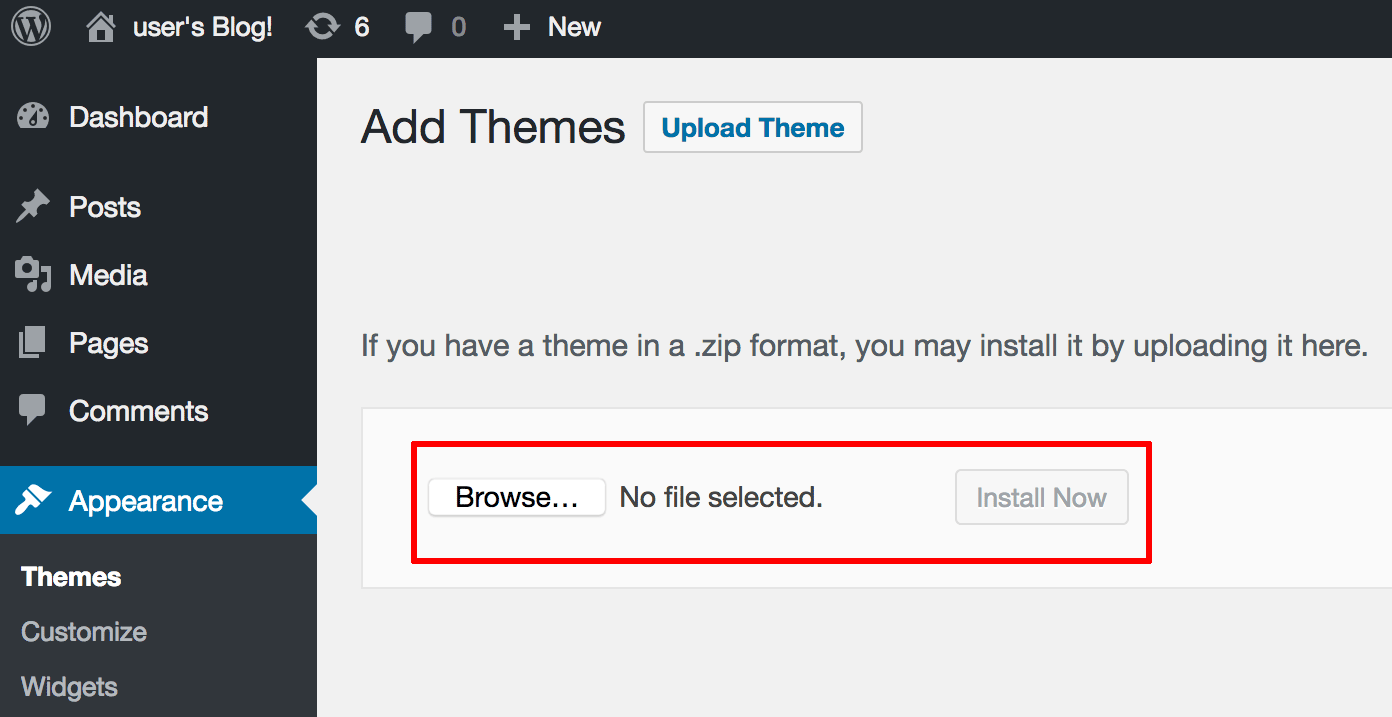
-
Once the theme has been uploaded, click the “Install Now” button to install it.
-
Activate the new theme using the “Appearance -> Themes” page.
Customize WordPress permalinks
By default, the Bitnami WordPress Stack uses “pretty permalinks”, wherein each post is identified by a unique URL containing the year, month, day and human-readable post title, such as http://DOMAIN/2017/08/07/my-first-post. However, you can customize how these URLs are generated, by changing the sequence of items or adding others such as the category name or author name.
To customize the permalink structure, follow these steps
-
Log in to the WordPress Dashboard using the administrator account (if you’re not already logged in).
-
Navigate to the “Settings -> Permalinks” page.
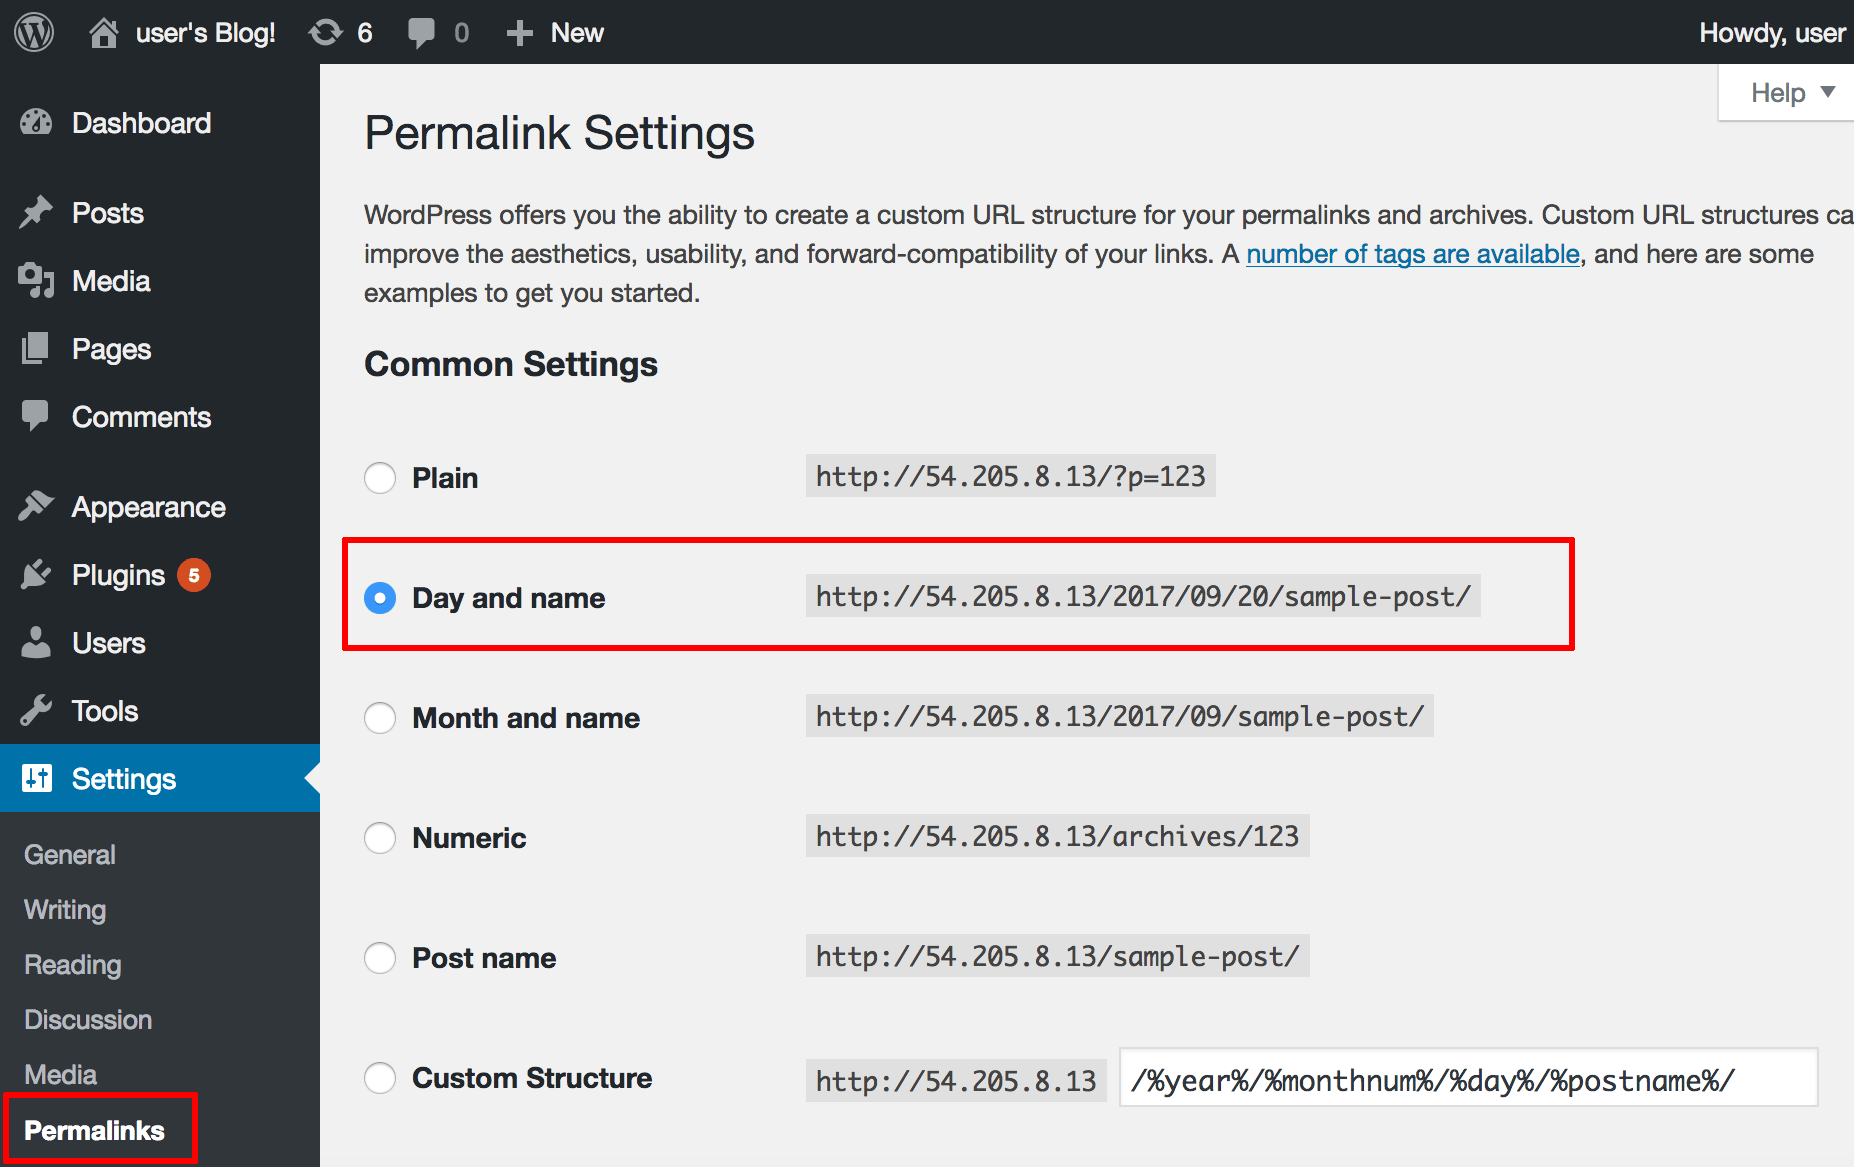
-
Select the “Custom Structure” option and edit the format to reflect your requirements. Here’s an example of a permalink structure that only include the author name and post title:
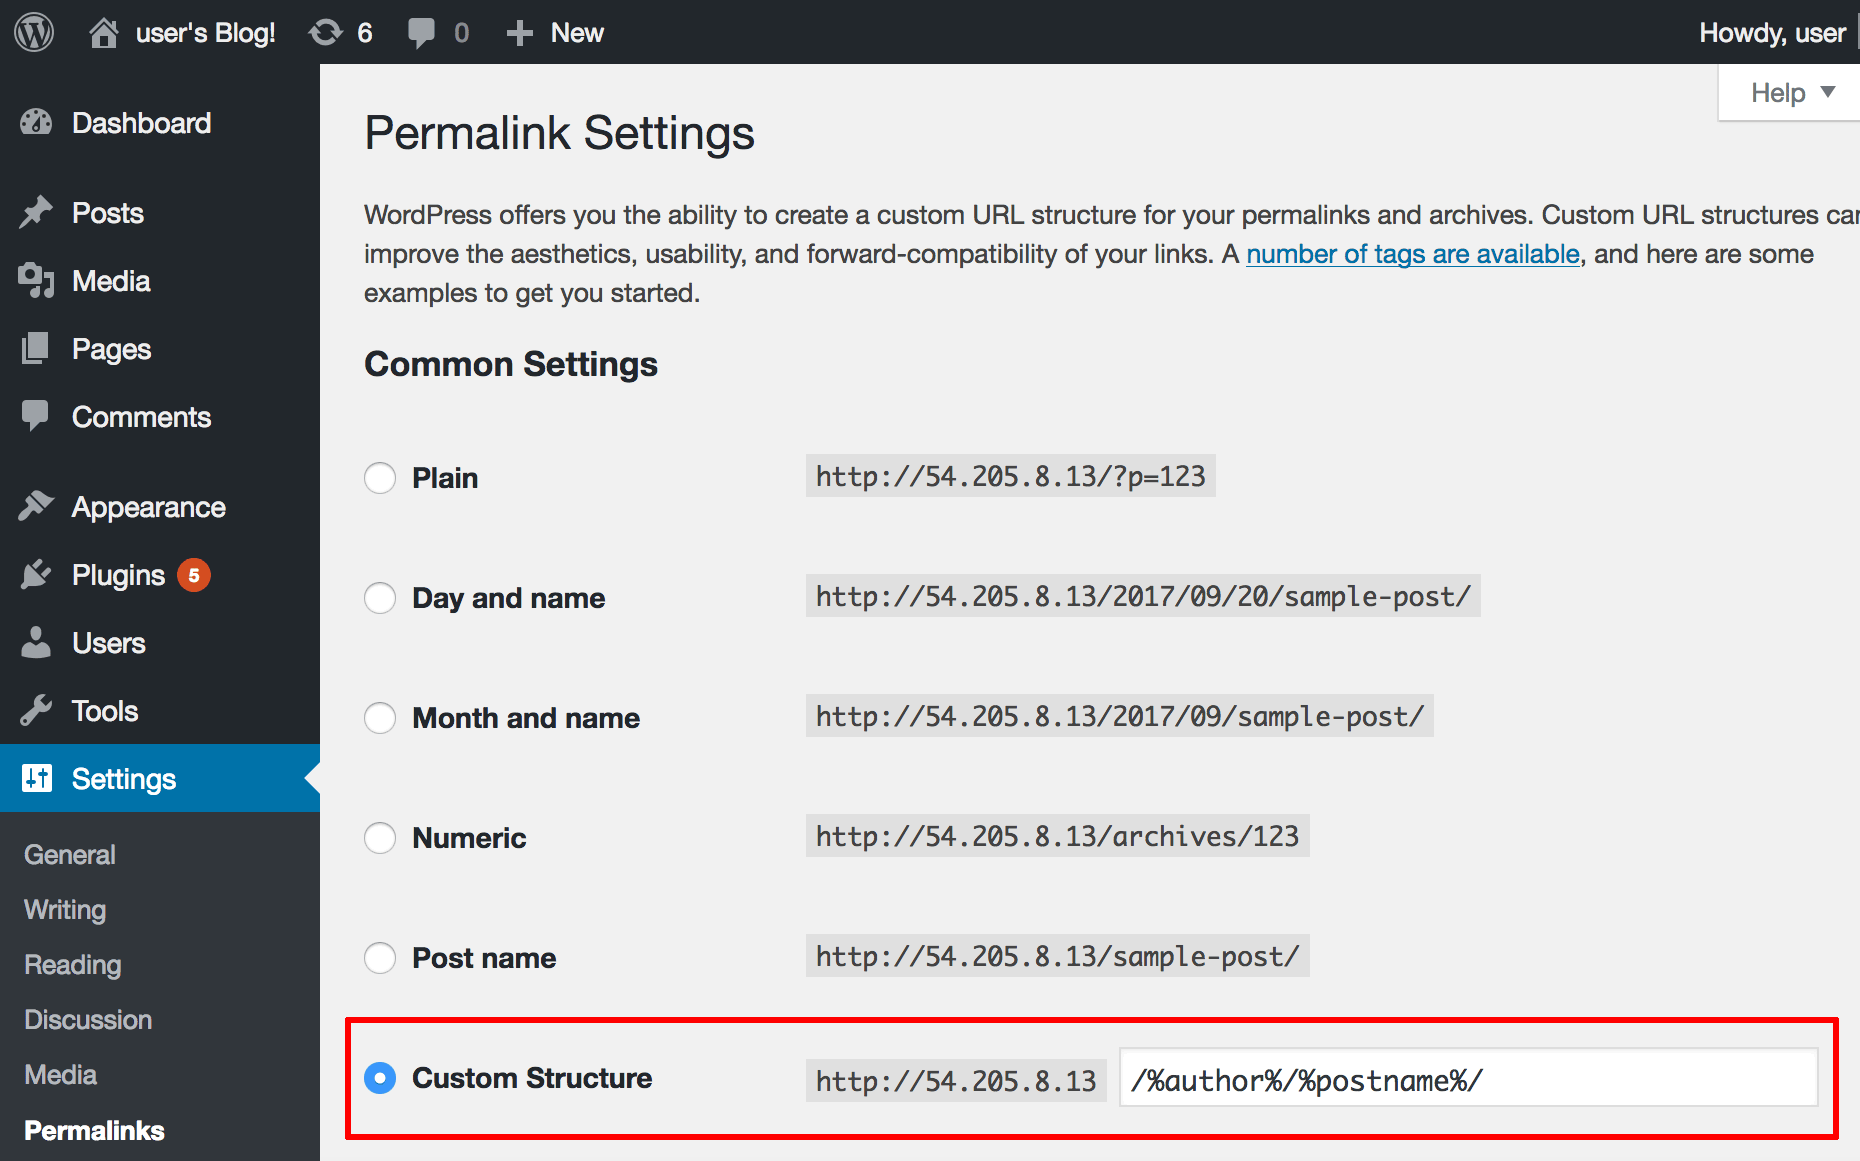
You will find a complete list of supported placeholders in the WordPress documentation.
-
Click “Save Changes” to save and activate the new permalink structure.
NOTE: Changes made to permalink structure will also affect previously published posts and pages. To avoid broken links, use a plugin like the Redirection plugin to redirect users from the older, broken URLs to the newer ones.
Transfer files using Secure FTP (SFTP)
There may be occasions when you need to upload a file to the WordPress server, or download a file from it, using an FTP client. Follow these steps:
-
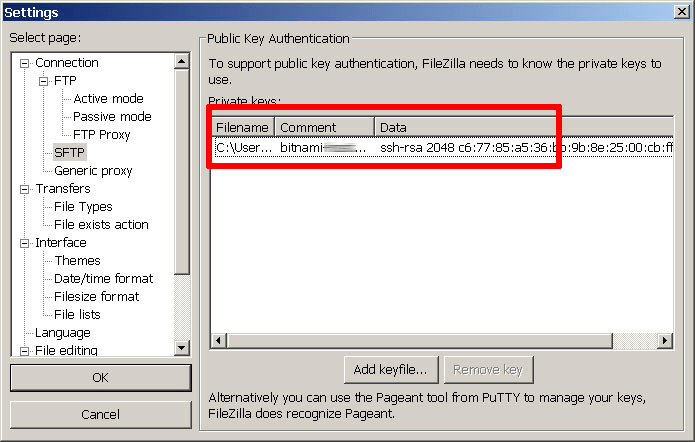
Launch FileZilla and use the “Edit -> Settings” command to bring up FileZilla’s configuration settings.
-
Within the “Connection -> SFTP” section, use the “Add keyfile” command to select the private key file for the server. FileZilla will use this private key to log in to the server.
-
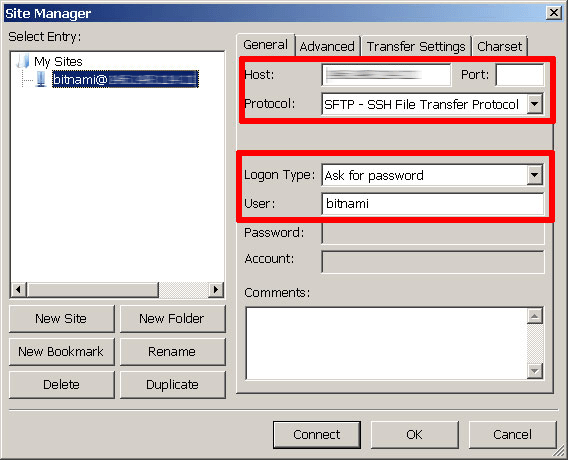
Use the “File -> Site Manager -> New Site” command to bring up the FileZilla Site Manager, where you can set up a connection to your server.
-
Enter your server host name and specify bitnami as the user name.
-
Select “SFTP” as the protocol and “Ask for password” as the logon type.
-
Use the “Connect” button to connect to the server and begin an SFTP session. You might need to accept the tls.key, by clicking “Yes” or “OK” to proceed. You should now be logged into the /home/bitnami directory on the server.
-
Using the file navigator, browse to the correct directory. For example, to /opt/bitnami/wordpress, the WordPress location in the file system.
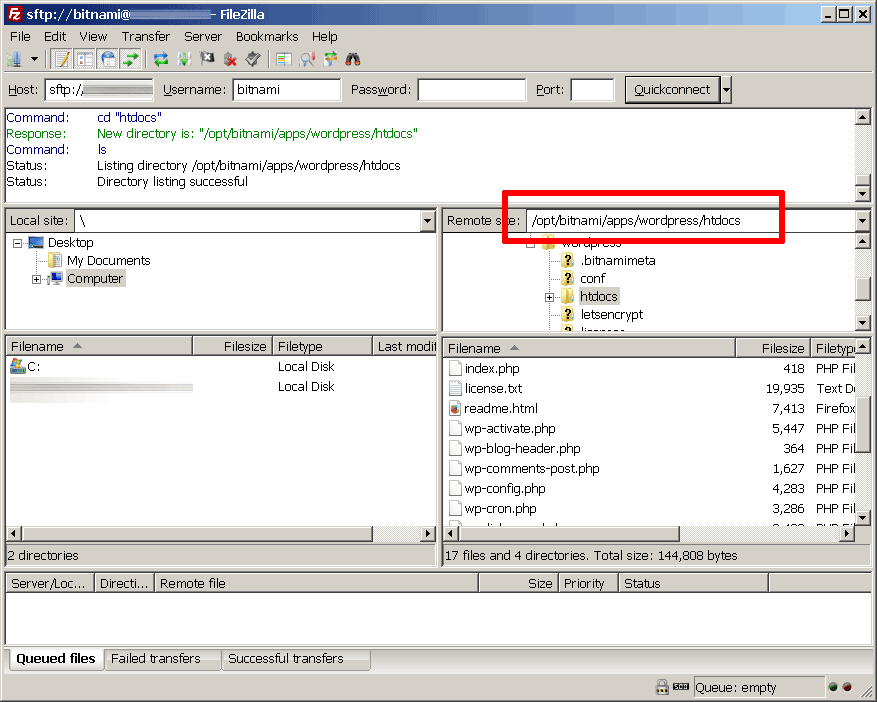
You can now transfer files by dragging and dropping them from the local server window to the remote server window, or vice-versa.
Manage the WordPress database with phpMyAdmin
One of the most important components of the Bitnami WordPress Stack is its MariaDB database. All your pages, posts and comments are stored in the database, together with user credentials, configuration options and other important bits of information.
The Bitnami WordPress Stack includes a Web-based MariaDB administration tool named phpMyAdmin. phpMyAdmin provides a point-and-click interface to many common database management tasks, making it easy to work with the WordPress database using your Web browser.
For security reasons, phpMyAdmin is accessible only when using 127.0.0.1 as the hostname. To access it from a remote system, you must create an SSH tunnel that routes requests to the Apache Web server from 127.0.0.1. This implies that you must be able to connect to your server over SSH in order to access it remotely.
NOTE: phpMyAdmin is a powerful database management tool and using it incorrectly could corrupt your WordPress installation. Before making any changes to your database using phpMyAdmin, it is a good idea to back up your WordPress deployment so that you can easily recover it in the event of an error.
Assuming you were able to connect to the server over SSH, you should be able to make some minor changes and access phpMyAdmin following the steps below:
Create an SSH tunnel
Windows
When configuring your SSH session as described in the section on connecting to the WordPress server over SSH, use the “Connection -> SSH -> Tunnels” section to create a secure tunnel by forwarding port 80 on the AWS server to port 8888 on your local Windows system. Click the “Add” button to add the secure tunnel configuration to the session, as shown below:
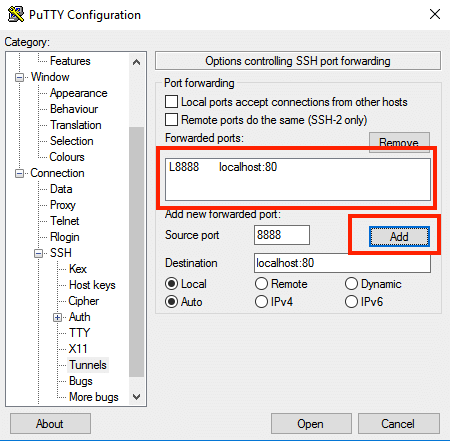
After configuring this tunnel, continue connecting as usual.
Linux and OS X
Connect to the server using the following command instead of the one shown in the section on connecting to the WordPress server over SSH:
$ ssh -N -L 8888:127.0.0.1:80 -i KEYFILE bitnami@SERVER-IP
Remember to replace KEYFILE in the previous command with the path to your private key file in PEM format, and SERVER-IP with the public IP address or hostname of your server.
Connect to phpMyAdmin
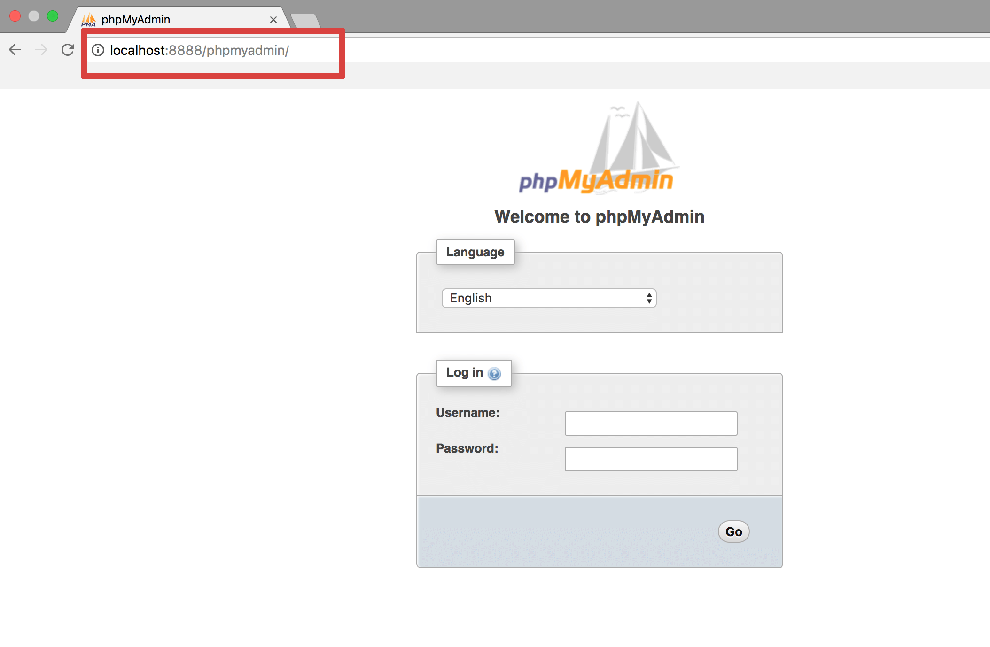
Once connected with the tunnel active, use your Web browser to browse to the URL http://127.0.0.1:8888/phpmyadmin. Here is an example of what you should see:
Log in to phpMyAdmin with the username root and the randomly-generated password generated when the server was deployed.
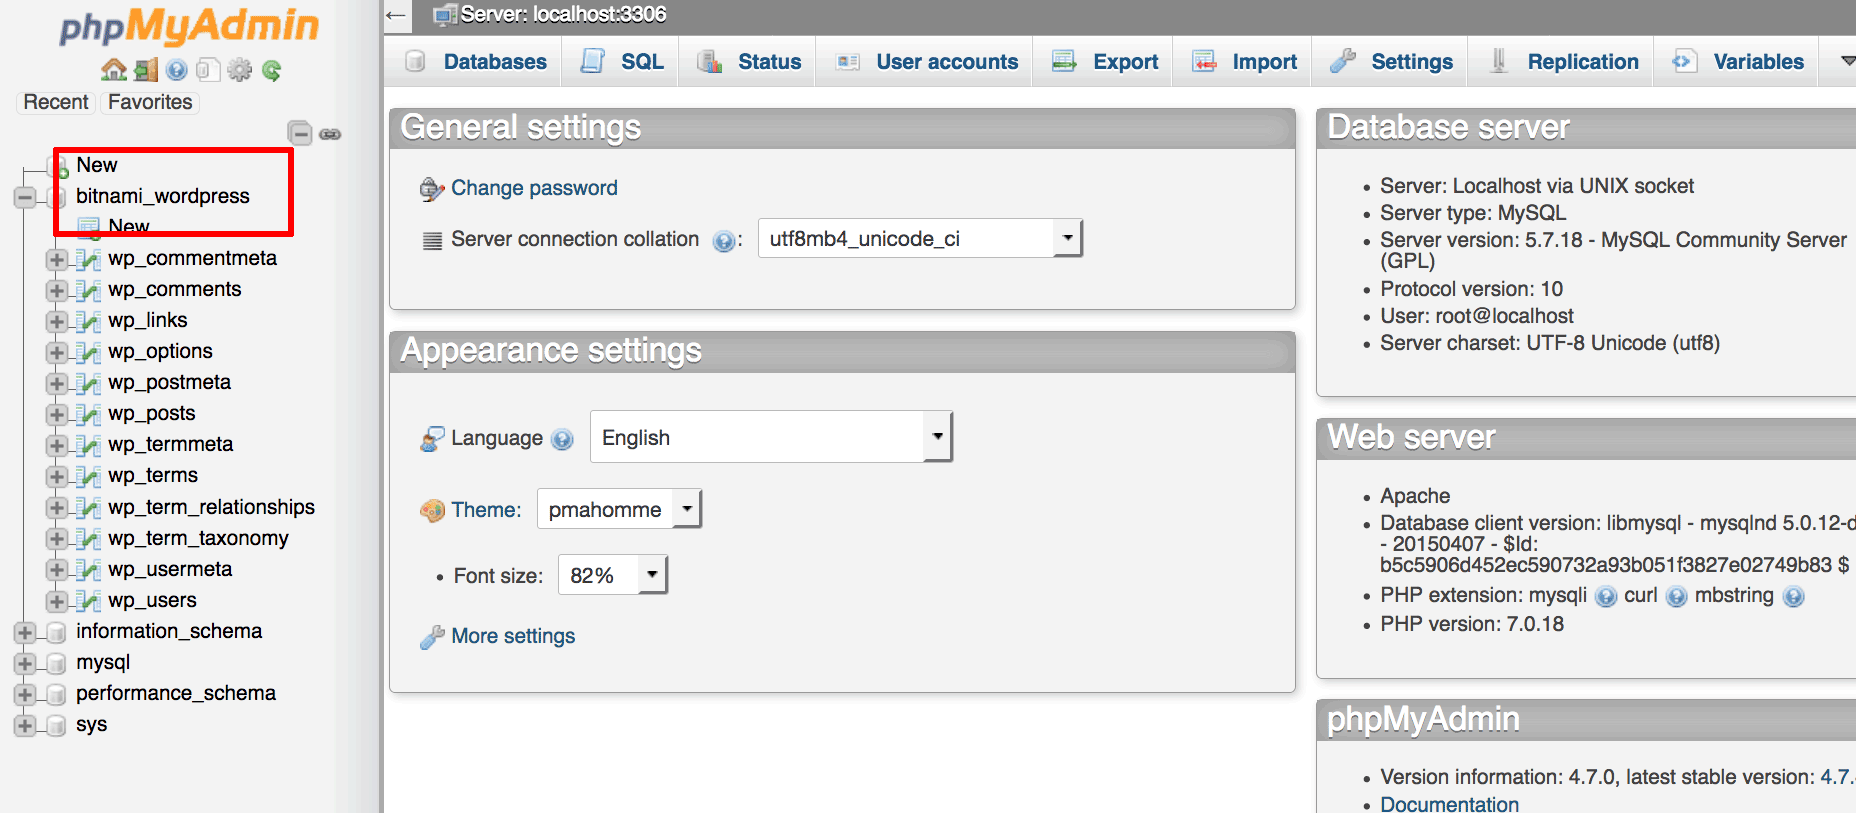
Once logged in, you should be able to access and manage the WordPress MariaDB database, which by default is named bitnami_wordpress.
Reset the WordPress administrator password with phpMyAdmin
In case you forget the administrator password for the WordPress Dashboard, you can reset it using phpMyAdmin. Follow these steps:
-
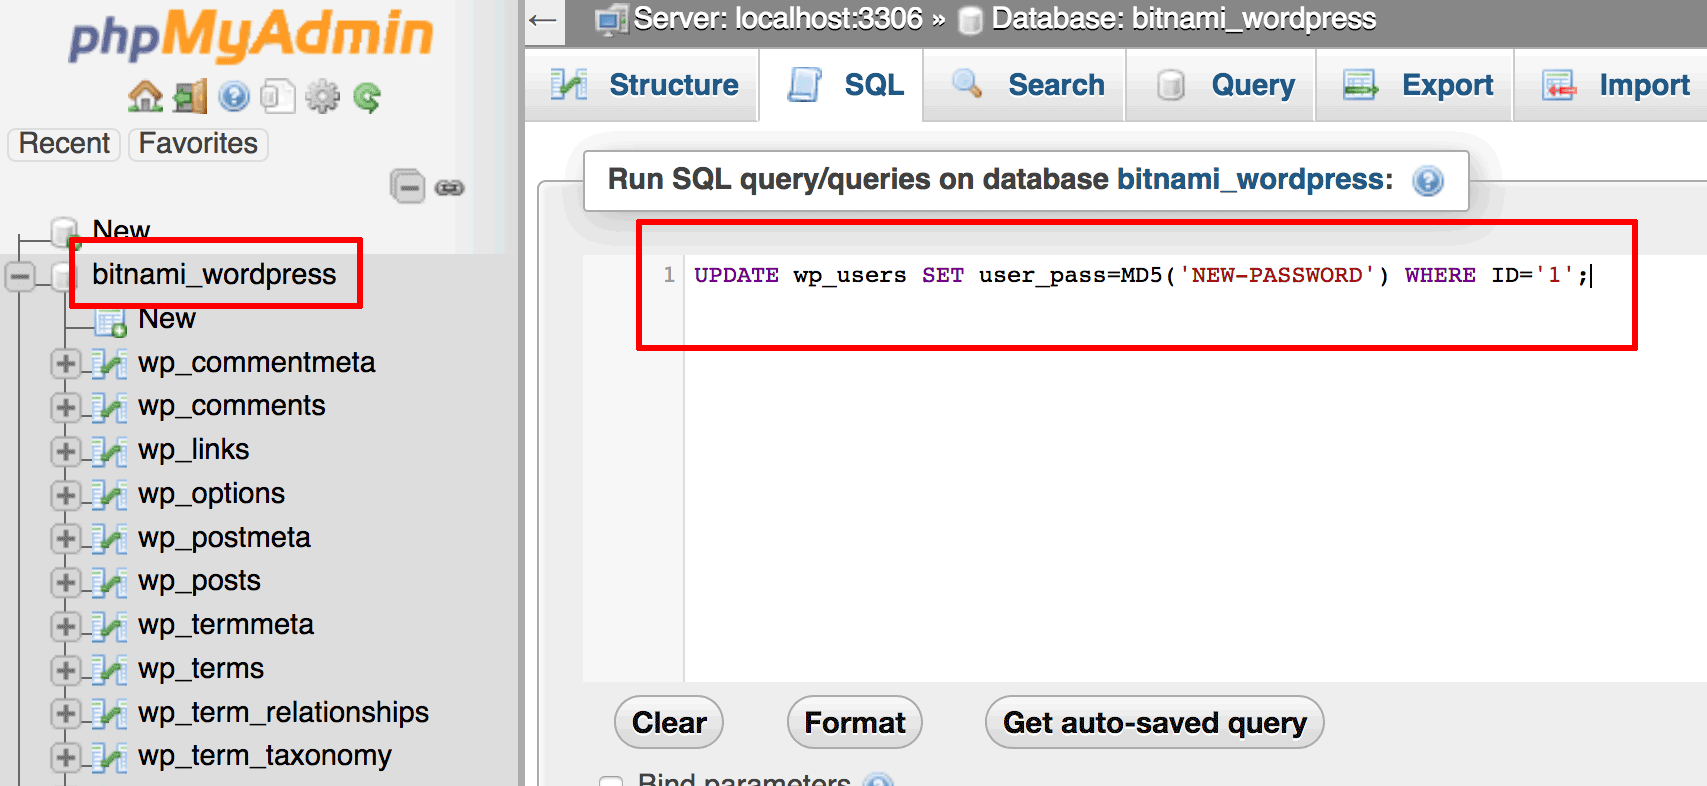
Select the bitnami_wordpress database.
-
Select the “SQL” menu item.
-
In the “Run SQL query” field, enter the following SQL query. Remember to update the NEW-PASSWORD placeholder with the new administrator password.
UPDATE wp_users SET user_pass=MD5('NEW-PASSWORD') WHERE ID='1'; -
Click “Go” to run the query.
You should now be able to log in to the WordPress dashboard using the new password.
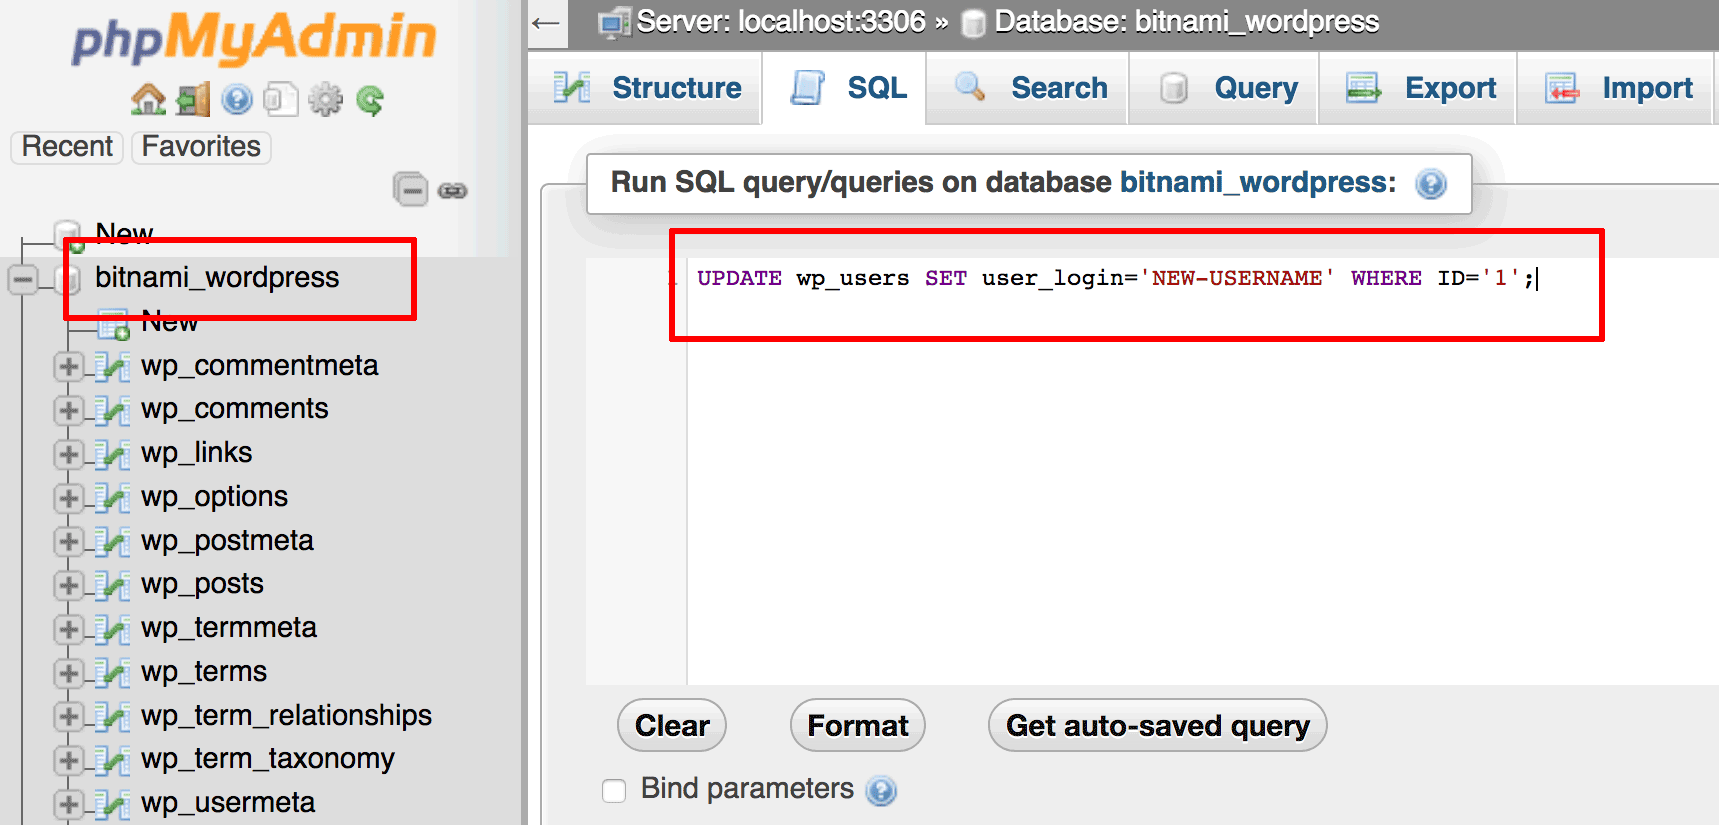
Change the WordPress administrator username with phpMyAdmin
By default, the Bitnami WordPress Stack set the username for the WordPress administrator account to user. If you wish to change this username, you can do so using phpMyAdmin. Follow these steps:
-
Select the bitnami_wordpress database.
-
Select the “SQL” menu item.
-
In the “Run SQL query” field, enter the following SQL query. Remember to update the NEW-USERNAME placeholder with the new administrator username you wish to use.
UPDATE wp_users SET user_login='NEW-USERNAME' WHERE ID='1'; -
Click “Go” to run the query.
You should now be able to log in to the WordPress dashboard using the new username.
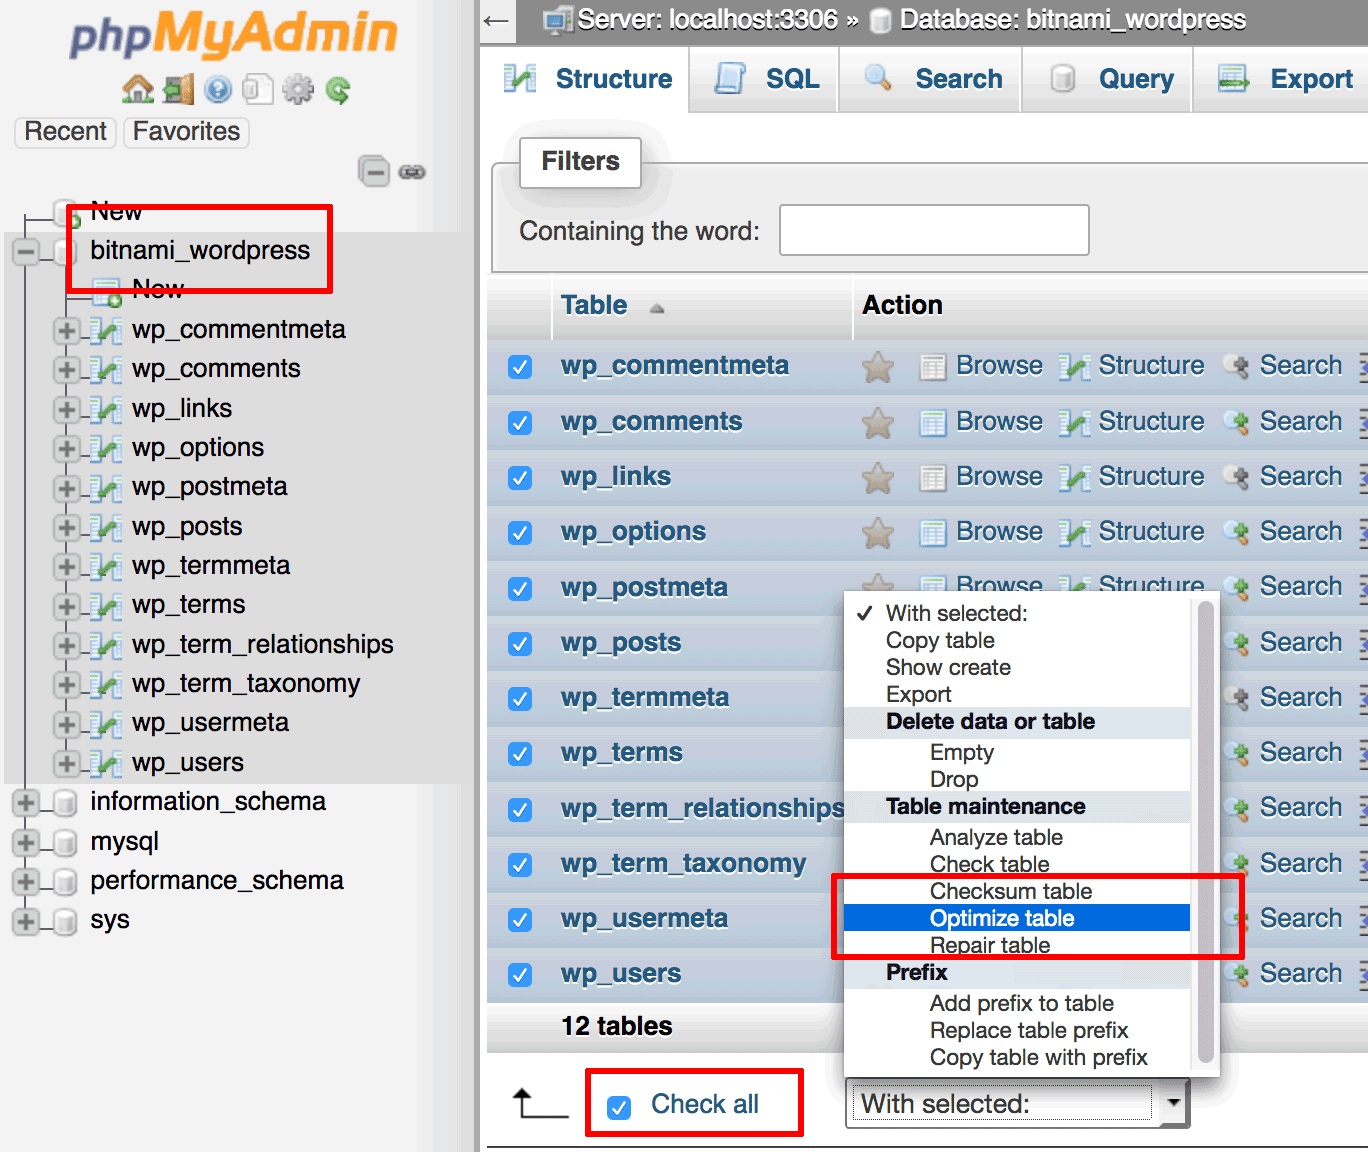
Optimize the WordPress database using phpMyAdmin
As you continue adding to, and deleting content from, your WordPress blog or website, your WordPress database will become fragmented. You can defragment it and thereby gain some improvement in performance by following these steps:
- Log in to phpMyAdmin.
- Select the bitnami_wordpress database.
- Select all the available tables using the “Check all” checkbox.
- From the available list of operations, select the “Table maintenance -> Optimize table” menu item.
Your tables will now be optimized and phpMyAdmin will display a summary of the results.
Useful links
If you’ve worked your way through all the above steps, you should have a good understanding of how to perform more advanced tasks with the Bitnami WordPress Stack. To learn more about the topics in this guide, visit the following links:
- Get started with Bitnami WordPress on AWS Marketplace (for beginners)
- Bitnami WordPress documentation
- WordPress manual
- Bitnami FAQ for AWS Cloud
- Migrate data from one WordPress instance to another
- Combine multiple independent WordPress websites/blogs into a single WordPress Multisite instance
- Separate a single WordPress Multisite instance into multiple independent WordPress websites/blogs