Access the server using an SSH tunnel
Bitnami strongly discourages you from opening server ports apart from those defined by default. In case you need to access a server on a specific port remotely, Bitnami recommends creating an SSH tunnel instead of opening the port in the server firewall.
Depending on your operating system, follow these instructions to create an SSH tunnel and ensure secure access to the application.
IMPORTANT: Before following the steps below, ensure that your application server is running.
Access a server using an SSH tunnel on Windows
In order to access your server via SSH tunnel you need an SSH client. In the instructions below we have selected PuTTY, a free SSH client for Windows and UNIX platforms.
- To access the server via SSH tunnel using PuTTY on a specific port you must have it configured. Learn how to connect to the server through SSH using an SSH client on Windows.
Once you have your SSH client correctly configured and you tested that you can successfully access to your instance via SSH, you need to create an SSH tunnel. For doing so, follow these steps:
-
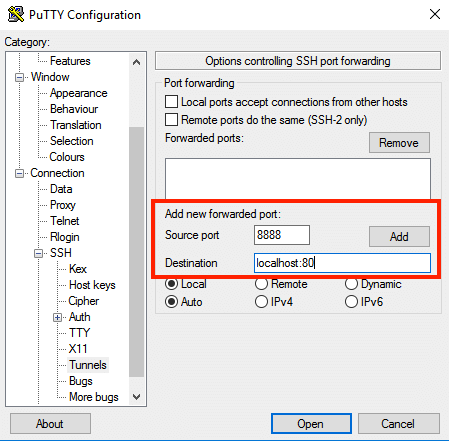
In the “Connection -> SSH -> Tunnels” section, create a secure tunnel by forwarding a port (the “destination port”) on the remote server to a port (the “source port”) on the local host (127.0.0.1 or localhost). An example of configuring an SSH tunnel between remote port 80 and local port 8888 is displayed below.
-
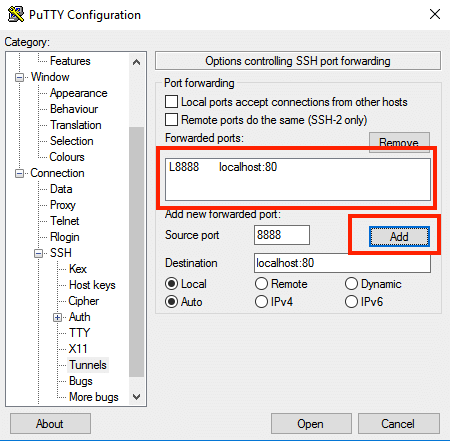
Click the “Add” button to add the secure tunnel configuration to the session. (You’ll see the added port in the list of “Forwarded ports”). An example of configuring an SSH tunnel between remote port 80 and local port 8888 is displayed below.
-
In the “Session” section, save your changes by clicking the “Save” button.
-
Click the “Open” button to open an SSH session to the server. The SSH session will now include a secure SSH tunnel between the two specified ports.
While the tunnel is active, you should be able to access the application through the secure SSH tunnel you created, by browsing to http://127.0.0.1:SOURCE-PORT/ or http://localhost:SOURCE-PORT/. Remember to replace SOURCE-PORT with the source port number specified.
Access a server using an SSH tunnel on Linux and Mac OS X
To access the server on a specific port using an SSH tunnel, you need to have the following information:
- Server’s IP address
- Username and password (if you want to connect the server using the SSH username and password).
- Server username and corresponding SSH private key in .pem format for Linux and Mac OS X (if you have deployed your server using an SSH key pair).
Learn how to obtain your SSH credentials for your client.
Once you have the information above, follow these instructions to access the server using an SSH tunnel:
-
Open a new terminal window on your local system (for example, using “Finder -> Applications -> Utilities -> Terminal” in Mac OS X or the Dash in Ubuntu).
-
You have two options to configure the SSH tunnel: connect to the server using a private key (recommended) or connect to the server using a SSH password. Follow the instructions below per each option:
-
Option 1: Connect to the server using a private key
-
Make sure that you have your SSH credentials (.pem key file) in hand.
-
Run the following command to configure the SSH tunnel. Remember to replace SOURCE-PORT with the source port, DESTINATION-PORT with the destination port, KEYFILE with the path to your private key, and SERVER-IP with the public IP address or hostname of your server:
$ ssh -N -L SOURCE-PORT:127.0.0.1:DESTINATION-PORT -i KEYFILE bitnami@SERVER-IP
-
-
Option 2: Connect to the server using a SSH password
-
Run the following command. Remember to replace SOURCE-PORT with the source port, DESTINATION-PORT with the destination port, USERNAME (bitnami by default or the username you have entered during the creation of the server) and SERVER-IP with the public IP address or hostname of your server. Enter your SSH password when prompted.
$ ssh -N -L SOURCE-PORT:127.0.0.1:DESTINATION-PORT USERNAME@SERVER-IP
-
NOTE: If successful, the above commands will create an SSH tunnel but will not display any output on the server console.
-
While the tunnel is active, you should be able to access the application through the secure SSH tunnel you created, by browsing to http://127.0.0.1:SOURCE-PORT/ or http://localhost:SOURCE-PORT/. Remember to replace SOURCE-PORT with the source port number specified.