Configure and use a Subversion repository
Create a Subversion repository
Connect to your server via SSH and execute the following commands to create the repositories directory at /opt/bitnami/repositories and then a new Subversion repository named myapp:
$ sudo mkdir /opt/bitnami/repositories
$ sudo svnadmin create /opt/bitnami/repositories/myapp
$ sudo chown -R bitnami:bitnami /opt/bitnami/repositories
Configure the Subversion repository URL
If no prefix is set in the Subversion scripts, specify the full path to the repository - for instance, svn://SERVER-IP/home/user/repository. In case this is not possible, add the repository path to the Subversion control script.
-
Edit the file /opt/bitnami/subversion/scripts/ctl.sh and update the svnserve command line with an additional –root parameter for the repository path. For example:
svnserve -d --listen-port=3690 --root=/path/to/repository -
Restart the Subversion server.
Browse a Subversion repository using a Web browser
To browse the Subversion repository using a Web browser, follow the steps below:
-
Update the Apache configuration file at /opt/bitnami/apache/conf/httpd.conf to load the following modules:
-
Update the Apache configuration file at /opt/bitnami/apache/conf/httpd.conf to load the following modules:
LoadModule dav_module modules/mod_dav.so LoadModule dav_fs_module modules/mod_dav_fs.so LoadModule dav_svn_module modules/mod_dav_svn.so LoadModule authz_svn_module modules/mod_authz_svn.so -
Update the Apache configuration for Subversion:
-
Edit the /opt/bitnami/apache/conf/vhosts/subversion-vhost.conf file and add the following lines. The directives below will let you view the default repository at /opt/bitnami/repository by browsing to http://SERVER-IP/.
<VirtualHost 127.0.0.1:80 _default_:80>
  ServerAlias *
  <Location />
    DAV svn
    SVNPath "/opt/bitnami/repository"
  </Location>
</VirtualHost>
-
-
Restart Apache:
$ sudo /opt/bitnami/ctlscript.sh restart apache
You should now be able to checkout the repository using a tool like TortoiseSVN. Simply enter the URL as http://SERVER-IP/repository as the repository checkout URL in the TortoiseSVN interface, as shown below.

Enable access over HTTPS
You can also access the repository over HTTPS if you have configured the Apache SSL certificate for your server. The following error can occur if the hostname reported by the server does not match the hostname in the SSL certificate. Make sure your server configuration uses the correct ServerName value.
svn: OPTIONS of 'https://example.com/repository': SSL negotiation failed: SSL error code -1/1/336032856 (https://example.com)
Enable commits over HTTP(S)
For security reasons, the default configuration does not allow users to commit changes to the repositories over HTTP or HTTPS. To permit this, change the permissions of your repository directory so that the Apache user is able to write to it.
Run the following command, assuming your repository is located at the default location of /opt/bitnami/repository:
$ sudo chown -R daemon:subversion /opt/bitnami/repository
IMPORTANT: Making this change will allow any user to commit changes to your repository. To avoid unauthorized commits and possible data loss, configure basic authentication for your repository as discussed in the next section
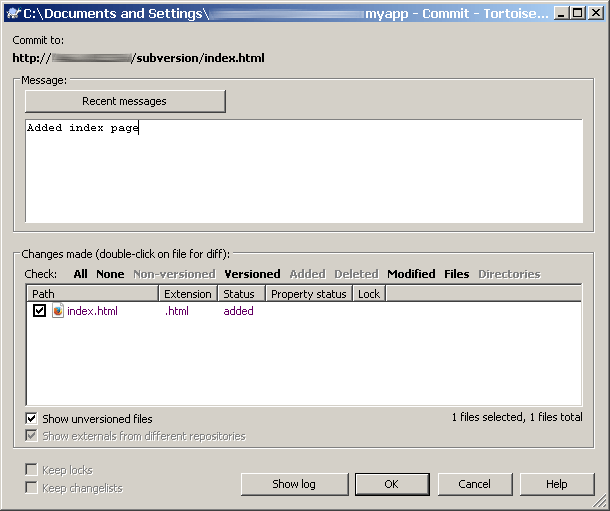
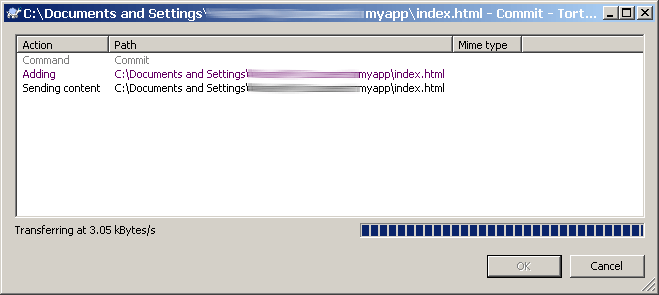
You should now be able to commit changes to the repository using a tool like TortoiseSVN, as shown below.
Configure basic authentication for a Subversion repository
Once your repository is accessible over HTTP(s), it is recommended that you protect it from unauthorized access by configuring authentication for different users. To do this, follow the steps below:
-
Update the Apache configuration to enable basic authentication:
-
Update the Apache configuration file at /opt/bitnami/apache/conf/vhosts/subversion-vhost.conf and add the highlighted directives below.
  <Location />
   DAV svn
   SVNPath "/opt/bitnami/repository"
   AuthType Basic
   AuthName "Subversion repository"
   AuthUserFile /opt/bitnami/repository/users
   require valid-user
  </Location>
With this configuration, repository access is only available to those users listed in the /opt/bitnami/repository/users file and they will need to authenticate themselves before gaining access. Note that you should update the path to the file based on the actual location of your repository.
-
-
Create the /opt/bitnami/repository/users file and add a user account named myuser to it using the following command. You will be prompted to enter a password for the user account. Note that you should update the path to the file based on the actual location of your repository.
$ sudo /opt/bitnami/apache/bin/htpasswd -c /opt/bitnami/repository/users myuser -
Repeat this step to add more users, omitting the -c argument on subsequent invocations. For example:
$ sudo /opt/bitnami/apache/bin/htpasswd /opt/bitnami/repository/users myotheruser -
Restart the Apache server.
$ sudo /opt/bitnami/ctlscript.sh restart apache
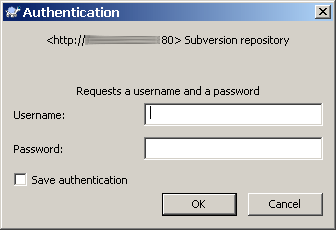
If you now attempt to browse to the repository or access it using TortoiseSVN, you will be prompted for a user name and password, as shown below:
Enable anonymous browsing
If you want your repository readable but not editable by any other user, perform the steps above but changing the line
require valid-user
to
<LimitExcept GET PROPFIND OPTIONS REPORT>
    require valid-user
</LimitExcept>
Enable HTTPS access only
If you only want to only allow access through HTTPS, not HTTP, you should add SSLRequireSSL to the directives described above:
  ...
  AuthName "Subversion repository"
  AuthUserFile /opt/bitnami/repository/users
  require valid-user
  SSLRequireSSL
</Location>
Configure SSH access to a Subversion repository
To create a repository that allows access remotely over SSH, follow these steps:
-
Connect to your server via SSH and execute the following commands to create the repositories directory at /opt/bitnami/repositories and then a new Subversion repository named myapp:
$ sudo mkdir /opt/bitnami/repositories $ sudo svnadmin create /opt/bitnami/repositories/myapp $ sudo chown -R bitnami:bitnami /opt/bitnami/repositories -
Assign your repository to a Redmine project. In Redmine, navigate to the project “Settings -> Repository” menu and add the following value in the “URL” field (username and password are not necessary):
file:///opt/bitnami/repositories/myapp -
Check if you have Subversion binaries in the system path even in the non-interactive SSH session. Execute the following command:
$ ssh -l bitnami -i KEYFILE SERVER-IP svnRemember to replace KEYFILE in the previous commands with the path to your private key file, and SERVER-IP with the public IP address or hostname of your server.
If you receive a “Command not found” error, update the /home/bitnami/.bashrc file and move all Bitnami path configuration from the bottom of this file to the top, above this line
[ -z "$PS1" ] && return -
Check out the repository now and start adding and committing new files. The repository should be available remotely via the following URL. The Subversion client should be configured to use the username bitnami and corresponding SSH key:
svn+ssh://xyz.bitnamiapp.com/opt/bitnami/repositories/myappRemember to replace xyz.bitnamiapp.com with the public IP address or hostname of your server.
-
To add a file to your repository, execute the following commands on your local host. Remember to replace bitnami-hosting.pem in the previous commands with the path to your private key file, and xyz.bitnamiapp.com with the public IP address or hostname of your server.
  $ export SVN_SSH="ssh -l bitnami -i bitnami-hosting.pem"
  $ svn checkout svn+ssh://xyz.bitnamiapp.com/opt/bitnami/repositories/myapp
  $ cd myapp
  $ echo "This is a simple test" > Readme.txt
  $ svn add Readme.txt
  $ svn commit -m "Adding simple readme file, closes #1"
Enable Subversion post-commit notifications
To configure a Subversion repository to send emails via SMTP with the commit log, follow these steps:
-
Download the latest source code from Subversion and copy the hooks directory into the /opt/bitnami/subversion directory:
$ wget http://apache.mesi.com.ar/subversion/subversion-1.8.9.tar.gz $ tar -xzvf subversion-1.8.9.tar.gz $ sudo cp -r subversion-1.8.9/tools/hook-scripts /opt/bitnami/subversion/hooks -
Copy the example mailer.conf file:
$ sudo cp /opt/bitnami/subversion/hooks/mailer/mailer.conf.example /opt/bitnami/subversion/hooks/mailer/mailer.conf -
Configure the SMTP mail settings in the mailer.conf file. Here is an example for a Gmail account:
[General] smtp_hostname = smtp.gmail.com:465 smtp_username = your_gmail_account smtp_password = your_password smtp_use_ssl = true ... [defaults] from_addr = mail@example.com # The default To: addresses for message. One or more addresses, # separated by whitespace (no commas). # NOTE: If you want to use a different character for separating the # addresses put it in front of the addresses included in square # brackets '[ ]'. to_addr = mail@example.com # If this is set, then a Reply-To: will be inserted into the message. reply_to = mail@example.com -
Configure your post-commit hook script to use the mailer.py and mailer.conf files. The location of your post-commit script depends on the location of your repository. Edit the /opt/bitnami/repositories/REPOSITORY-NAME/hooks/post-commit.tmpl file and replace the last line with the following one:
/opt/bitnami/python/bin/python /opt/bitnami/subversion/hooks/mailer/mailer.py commit "$REPOS" "$REV" /opt/bitnami/subversion/hooks/mailer/mailer.confIn case the /opt/bitnami/python directory does not exist, use the system’s Python binary, usually at /usr/bin/python.
-
Enable the post-commit hook by renaming the post-commit script and removing the .tmpl extension:
$ sudo mv /opt/bitnami/repositories/your_repo/hooks/post-commit.tmpl /opt/bitnami/repositories/your_repo/hooks/post-commit
To test it, change a file and commit the changes. In case of an error, the error message will be displayed after the commit.