Get Started with MongoDB Replication using GCP Marketplace
Introduction
MongoDB is an open source, document-oriented scalable NoSQL database designed for high performance and scalability. The Bitnami MongoDB with Replication template for GCP Marketplace allows you to create a MongoDB replica set that provides redundancy and high availability in production environments.
This guide describes how to configure and use the Bitnami MongoDB with Replication template with GCP Marketplace.
NOTE: The steps below assume that you already have a Google Account and project configured for use with Google Compute Engine.
Step 1: Configure MongoDB
In a MongoDB replica set, copies of the MongoDB database are maintained on separate server nodes. Spreading the data across multiple nodes significantly reduces the risk of application failure and data loss in the event of a hardware failure.
A MongoDB replica set consists of two types of nodes:
-
Server nodes: Each server node hosts its own copy of the MongoDB data. One node is designated as the primary node and receives all write operations, while other nodes are designated as secondary nodes and replicate the operations performed by the primary node on their own copies of the data set. If a primary node fails, one of the secondary nodes will become the new primary after an internal “election”.
-
Arbiter nodes: Arbiter nodes do not host any data. Their function is to provide an additional vote in replica set elections.
NOTE: In a replica set, you can have one primary node, zero or more secondary nodes, and zero or one arbiter node. The total number of server nodes in a replica set cannot be higher than 6 (1 primary and 5 secondaries). You can also add an optional extra one as arbiter.
To use the Bitnami MongoDB with Replication template, launch it from the GCP Marketplace and you will be presented with a configuration screen like the one below:
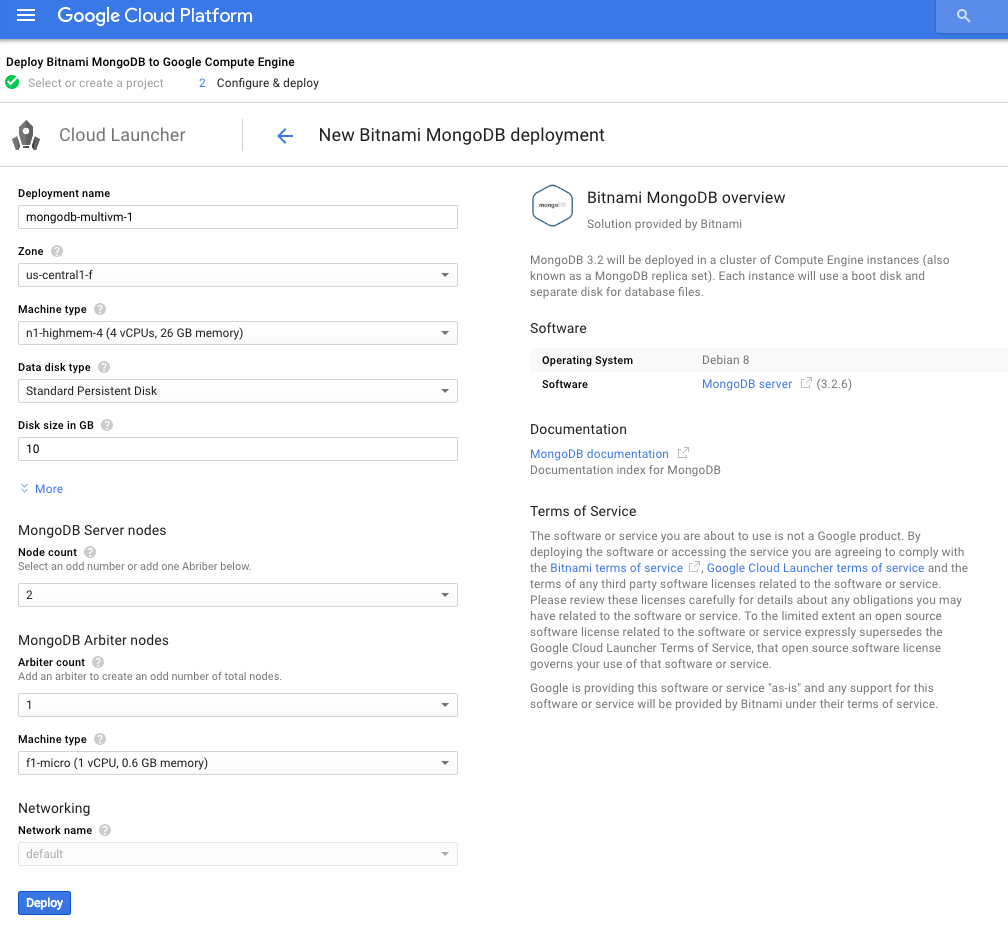
Configure the template using the information below:
- Deployment name: Enter a unique identifier for the deployment.
- Zone: Select the geographic region of the data center hosting the deployment.
- Machine and disk type: Select the CPU, RAM and disk type appropriate to your requirements.
- Disk size in GB: Select storage capacity after carefully considering your data storage requirements.
- MongoDB server nodes: Select an odd number of server nodes or, using an even number of nodes, add an arbiter node
- MongoDB arbiter nodes: Add an arbiter node to ensure the total number of nodes in the replica set is an odd number
NOTE: Ensuring an odd number of total nodes avoids the risk of tied elections if a primary node becomes unavailable.
By default, Bitnami Multi-Tier Solution templates are deployed with port 22 (the SSH access port) disabled. This is to increase the overall security of the deployment. Bitnami recommends specifically enabling this port for SSH traffic from trusted IP addresses or IP address ranges at deployment time. To do so, follow these steps in the template configuration screen:
-
Find the “Firewall” section of the configuration template.
-
Check the box marked “Allow SSH traffic from the Internet”.
-
Add a list of trusted IP addresses or address ranges in the “Source IP ranges for SSH traffic” field. Set this value to 0.0.0.0/0 to allow SSH access from any IP address, or to a trusted IP address or IP address range to allow access from specific hosts only.

NOTE: If you do not enable SSH access for remote connections as described above, you will not be able to connect to the nodes via the Web console or an external SSH client.
Once configuration is complete, click “Deploy” to launch the deployment.
For more information on MongoDB replica sets, refer to the official documentation.
Step 2: Configure SSH keys
The GCP Marketplace requires the user to manually add a public SSH key using the server administration page. It then uses the user@hostname comment at the end of the public SSH key to decide which user account on the server should be associated with the key.
The steps below walk you through the process of configuring the MongoDB server for use with an external SSH client. It assumes that you will be logging in as the bitnami user. The same process can be followed for other users and server nodes as well.
Follow the steps:
-
Prepare an SSH key pair for use.
-
Log in to the Google Cloud Console and select your project.
-
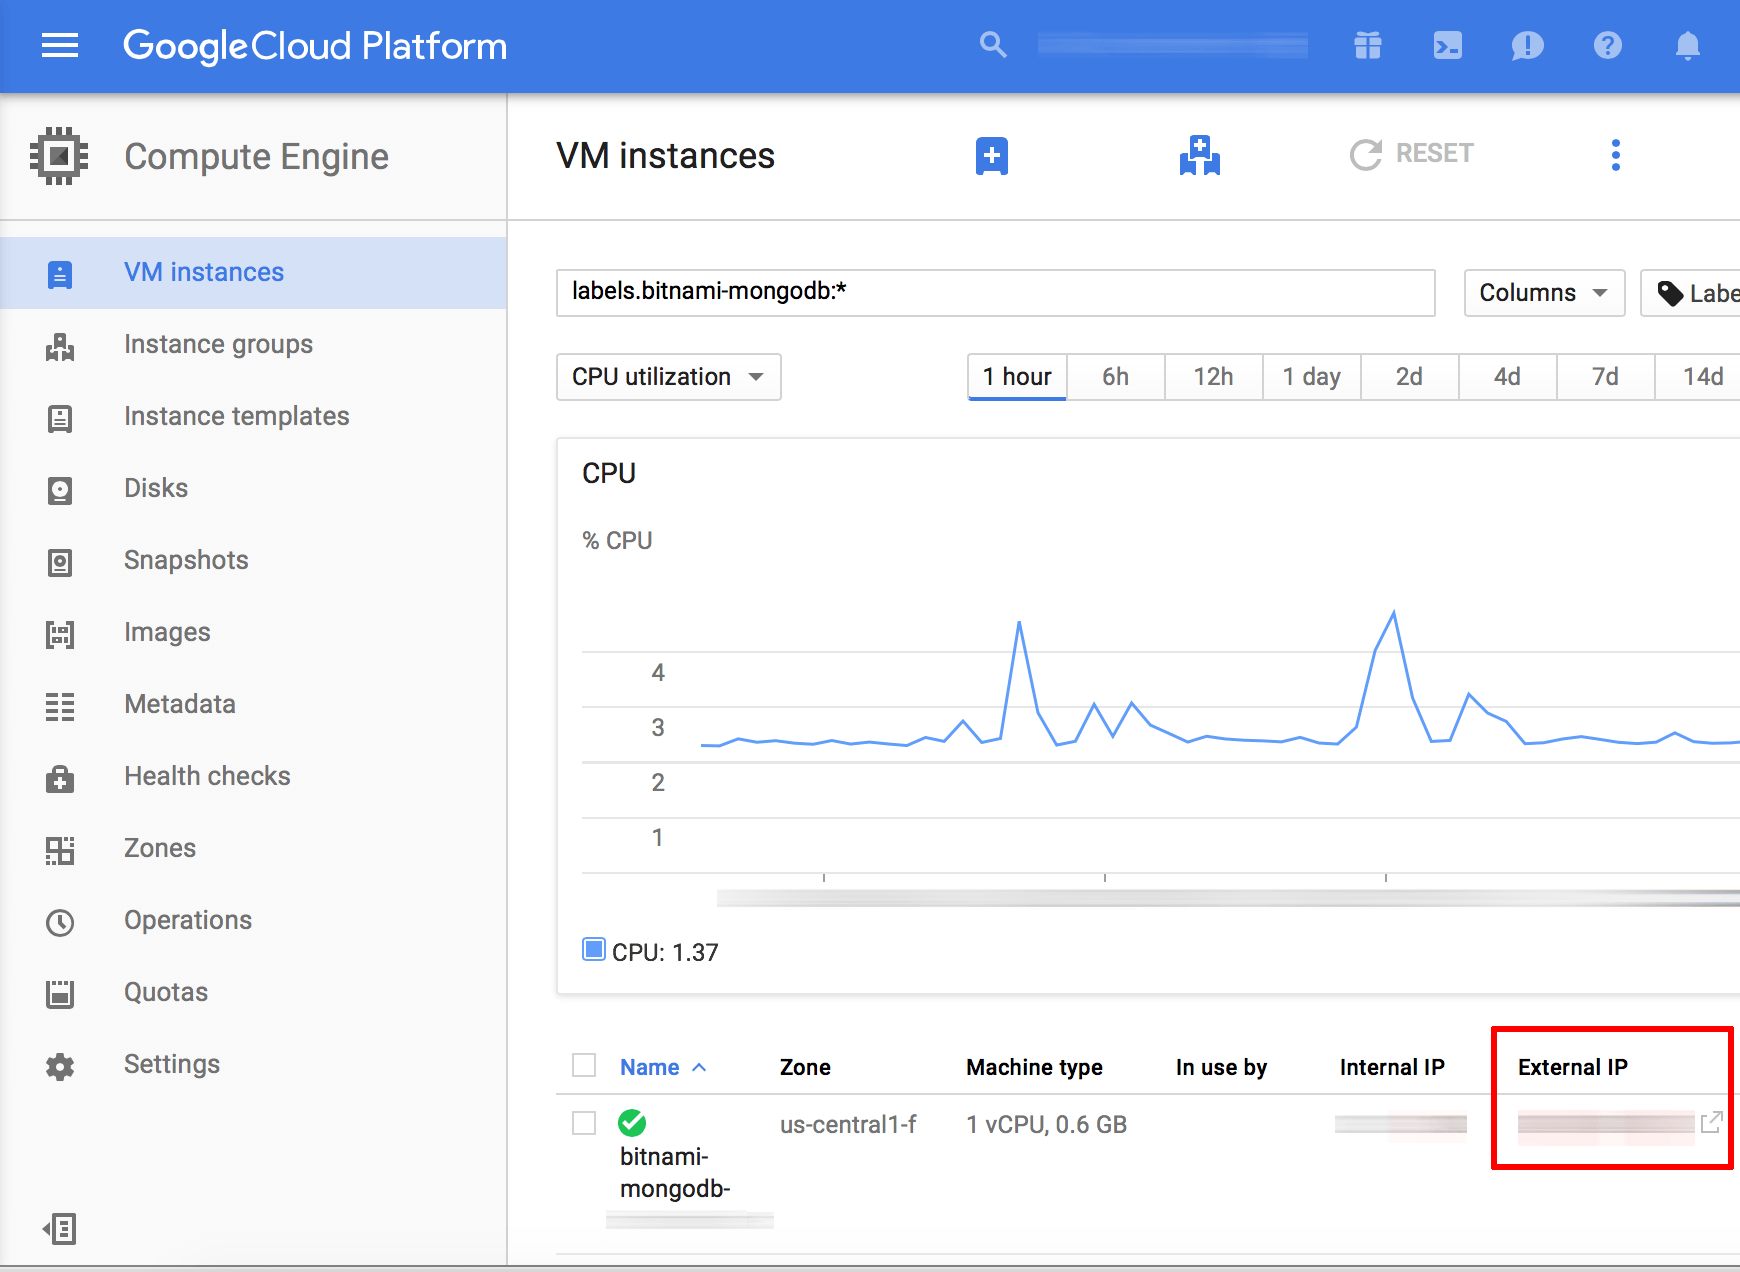
Navigate to the “Compute Engine -> VM Instances” page and select the MongoDB server node you wish to connect to. Note the public IP address of the instance.
-
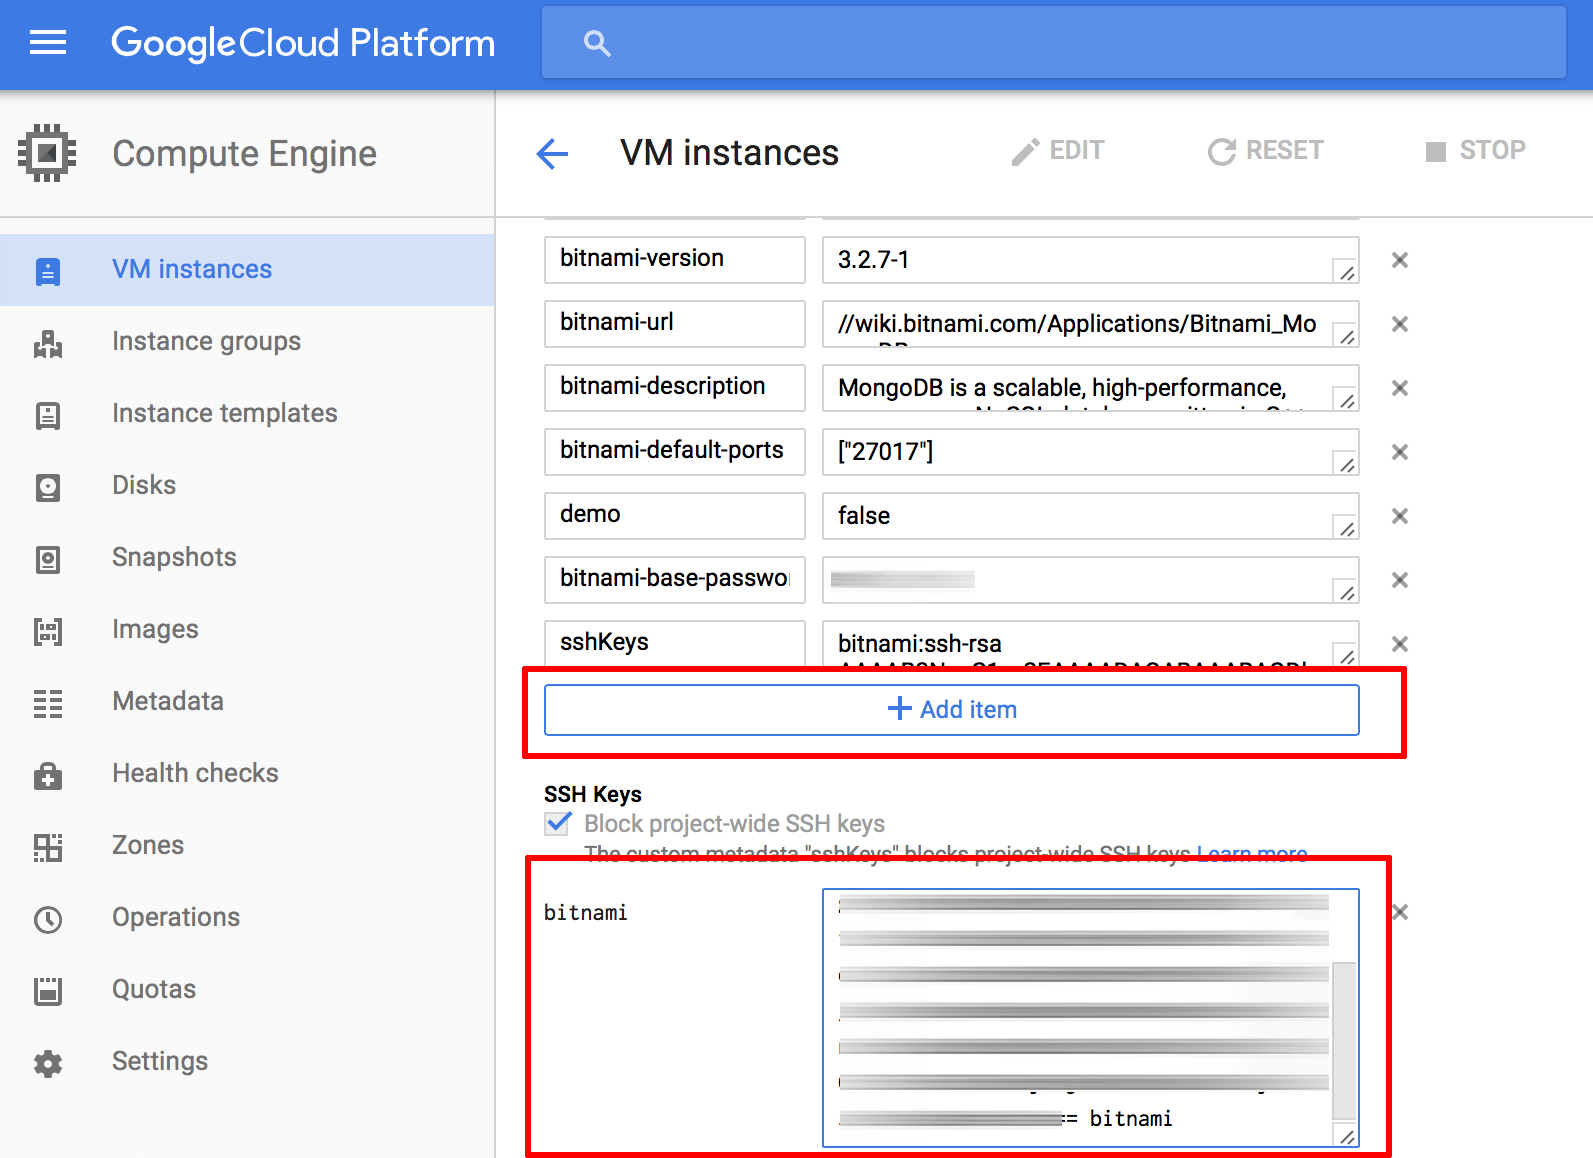
Click the “Edit” link in the top control bar.
-
On the resulting page, copy and paste your public SSH key into the “SSH Keys” field.
-
Update the user@hostname comment at the end of the SSH key content to bitnami. This will associate the SSH key with the bitnami user account that is already present on the server. The “Username” next to the form field will update accordingly.
-
Add more keys as needed by clicking the “Add Item” button. Once done, save the changes by clicking the “Save” button.
You should now be able to use any third-party SSH client and the corresponding private SSH key to log in to the server as the bitnami user.

Step 3: Connect and create a MongoDB database
At the server console, connect to MongoDB using a command like the one below.
$ mongo --host SERVER-IP --port 27017
This should launch the MongoDB shell.
Here are the basic commands to create a database for your application using the MongoDB shell. Note that this example creates a database name mydb and a user named myuser with password mypassword. Replace these example values with values suitable for your intended use when executing the commands below.
MongoDB shell version: 3.2.7
connecting to: 127.0.0.1:27017/admin
> db = db.getSiblingDB('mydb')
mydb
> db.createUser( { user: "myuser", pwd: "mypassword", roles: [ "readWrite", "dbAdmin" ]} )
Successfully added user: { "user" : "myuser", "roles" : [ "readWrite", "dbAdmin" ] }
> exit
Some applications may require specific privileges in the database. Consult the official installation steps in the application documentation.
To learn more, refer to the official MongoDB documentation.